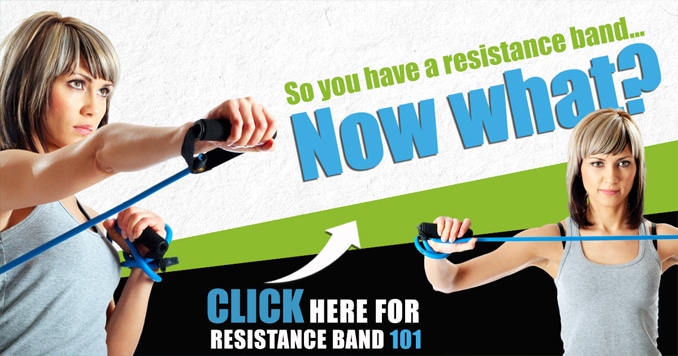
Adding resistance band stretches into your fitness routine can take your workout to the next level. Resistance bands offer a versatile and practical way to improve strength, flexibility, and endurance, making them suitable for beginners and seasoned athletes. Their lightweight and portable design can be easily incorporated into any exercise regimen, making them perfect for home workouts or when on the go.
Resistance band stretches target multiple muscle groups, aiding in expanding the range of motion, boosting muscle activation, and elevating overall athletic performance. Giving your hamstrings, glutes, and inner thigh stretch can strengthen and tone your arms and improve your posture. The possibilities are endless with these simple yet powerful workout tools.
Benefits of Incorporating Resistance Band Stretches into Your Fitness Routine
Adding resistance band stretches into your fitness routine offers numerous benefits. Firstly, it enhances flexibility, lowering injury risk and expanding motion range. This is especially advantageous for those with tight muscles. The deeper this stretch, the more profound the impact on your flexibility and the greater the reduction in injury risk.
Additionally, resistance band stretches improve muscle strength by providing consistent resistance, aiding muscle growth without heavy equipment. They also enhance muscle activation, targeting specific muscle groups and addressing imbalances for better performance and injury prevention.
Moreover, these stretches provide a convenient, portable workout solution, ideal for travelers or home exercisers. Lightweight and easily transported, resistance bands ensure you can maintain your fitness routine anytime, anywhere.
Different Types of Resistance Bands
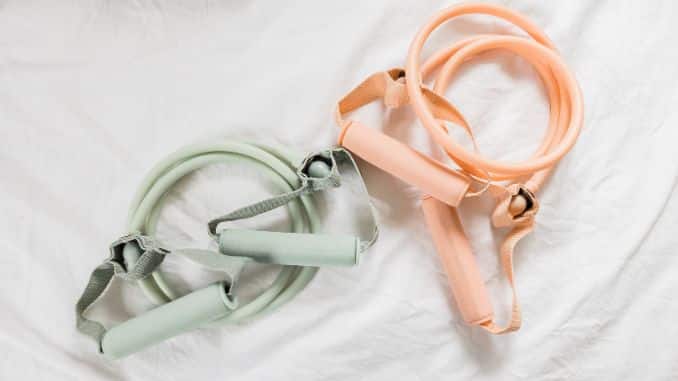
Resistance bands come in various types, each with unique characteristics and uses. The most well-known types of resistance bands include loop bands, tube bands, and flat bands.
Resistance Bands Types
A. Loop Bands (Mini Bands)
- Small, circular bands.
- Used for lower body exercises (e.g., squats, lunges, lateral leg raises).
- Varying resistance levels for customization.
B. Tube Bands
- Long, elastic tubes with handles.
- Versatile for both upper and lower-body exercises.
- Activities include bicep curls, triceps extensions, rows, and chest presses.
- Available in different resistance levels.
C. Flat Bands
- Flat, wide bands without handles.
- Ideal for stability and control exercises (e.g., lateral walks, glute bridges, banded quad stretch, shoulder external rotations).
- Different resistance levels to accommodate strength progression.
Choosing the Right Band
- Consider your fitness level.
- Evaluate the type of exercise planned.
- Check the band's quality for durability during workouts.
Proper Form and Technique for Resistance Band Stretches
Proper form is crucial when performing resistance band stretches to ensure you get the most out of your workout and avoid injury. Here are some essential tips to keep in mind:
Start by choosing the appropriate resistance band for your fitness level: The band should offer enough resistance to challenge your muscles but be easy to use with proper form.
When performing resistance band stretches, maintain good posture and alignment: Stand upright with your shoulders back and down, and contract your core muscles to stabilize your body. Avoid rounding your back or hunching your shoulders.
Keep the band securely in place during exercises: Make sure that it is appropriately anchored or held in a way that allows you to create tension throughout the movement. This will guarantee that you are effectively targeting the intended muscle group.
Manage the movement and avoid using momentum to complete the exercise: Focus on a slow and controlled motion, feeling the band's resistance throughout the range.
Breathe throughout the exercise: Inhale during the more accessible part of the movement and exhale as you exert effort or when the resistance is most excellent.
Should you feel pain or discomfort while exercising: Cease activity immediately and seek guidance from a fitness professional or healthcare provider. It's important to listen to your body and avoid pushing through pain.
By following these guidelines, you can ensure that you are performing resistance band stretches safely and effectively, maximizing the benefits of your workout.
Targeted Muscle Groups and Exercises with Resistance Bands
Resistance bands can target various muscle groups and perform multiple exercises. Here are some examples of targeted muscle groups and routines you can do with resistance bands:
- Legs: Resistance band squats, lunges, glute bridges, leg curls, and lateral leg raises can target the muscles in your thighs, hips, and glutes.
- Arms: Bicep curls, triceps extensions, shoulder presses, and lateral raises are just a few exercises that can help tone and strengthen your arms using resistance bands.
- Back: Resistance band rows, pull-apart, and reverse flies can effectively target your back muscles, helping to improve posture and upper body strength.
- Chest: Resistance band chest presses and chest flyes are great exercises for targeting your chest muscles and improving upper body strength.
- Core: Resistance band woodshops, Russian twists, and standing oblique crunches can engage your core muscles and help to improve stability and balance.
- Shoulders: Resistance band shoulder external rotations, upright rows, and front raises can target your shoulder muscles and improve upper body strength.
The versatility of the bands allows you to tackle specific muscle groups ( Quadriceps, Hamstring, Hip Flexors, Glutes, Calves, etc.) or perform full-body workouts, depending on your goals and preferences. Experiment with different exercises to find the ones that work best for you.
Best Resistance Band Stretches
Warm-up
1. Shoulder Roll
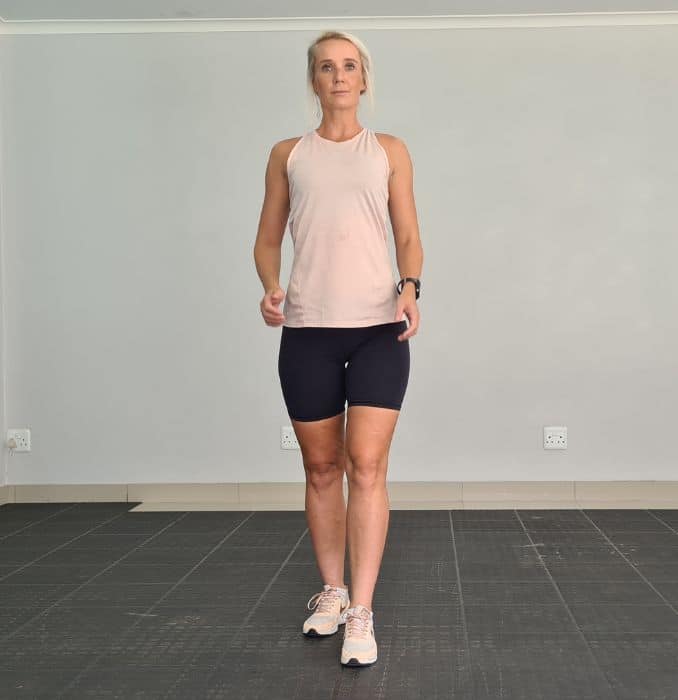
Begin in an upright standing position with your feet shoulder-width apart, maintaining good alignment with your head, shoulders, hips, and legs. Step your one foot forward and engage your core. Lift your shoulders, then roll them down and back until you feel resistance in your shoulder blades. Lower your shoulders to the starting position, relax, and repeat the movement in the opposite direction—complete 10 repetitions.
 |
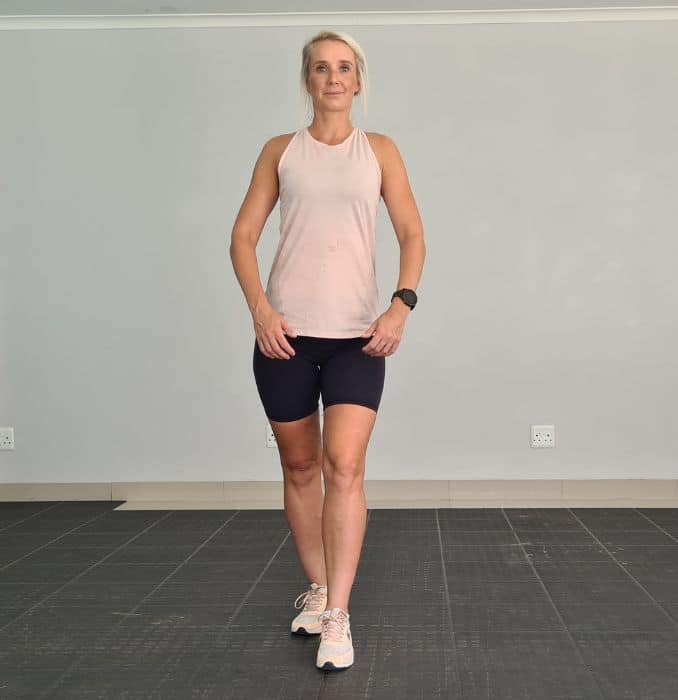 |
Shoulder Roll
2. Standing Twist
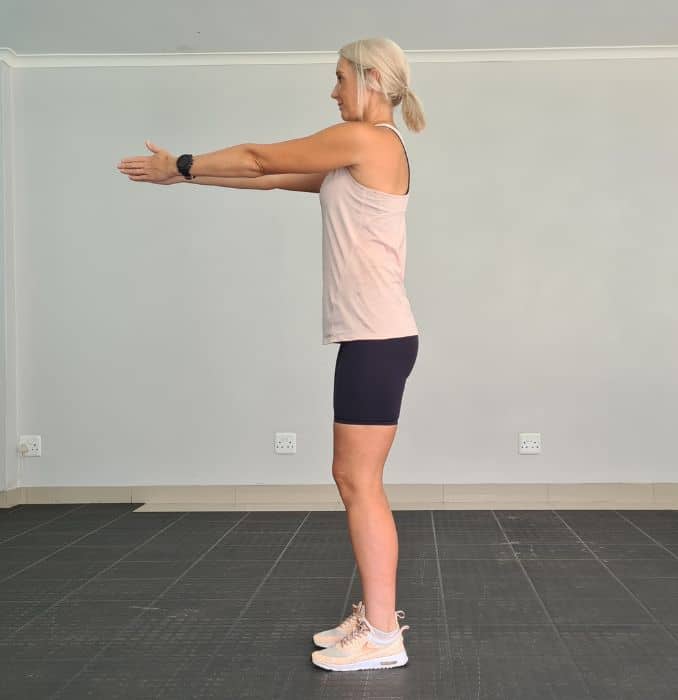
Begin in an upright standing position with your feet shoulder-width apart, maintaining good alignment with your head, shoulders, hips, and legs. Extend your arms in front of your body with your palms pressed together at chest height. Engage your core and twist your upper body as you open one arm out to the side, keeping your hips locked in the forward position. Return to the starting position and repeat the movement on the opposite side. Complete 10 repetitions.
 |
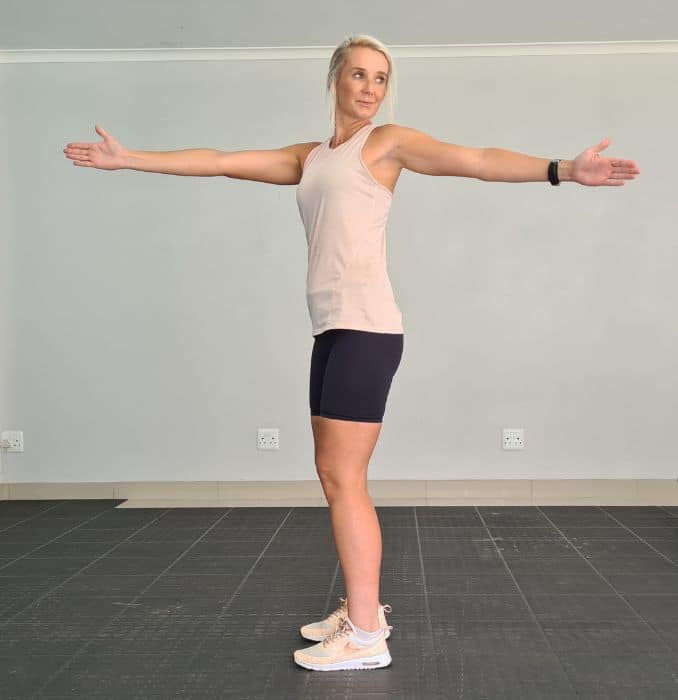 |
Standing Twist
3. Overhead Reach
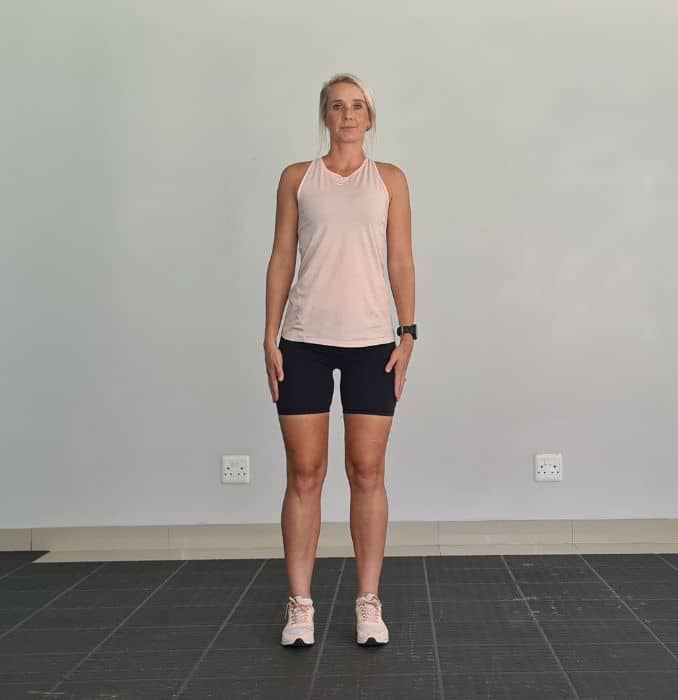
Begin in an upright standing position with your feet shoulder-width apart, maintaining good alignment with your head, shoulders, hips, and legs. Place your hands at your sides. Engage your core and bend your upper body to the side, reaching over your head with one arm. Return to the starting position and repeat the movement on the opposite side. Start with 10 repetitions on each side.
 |
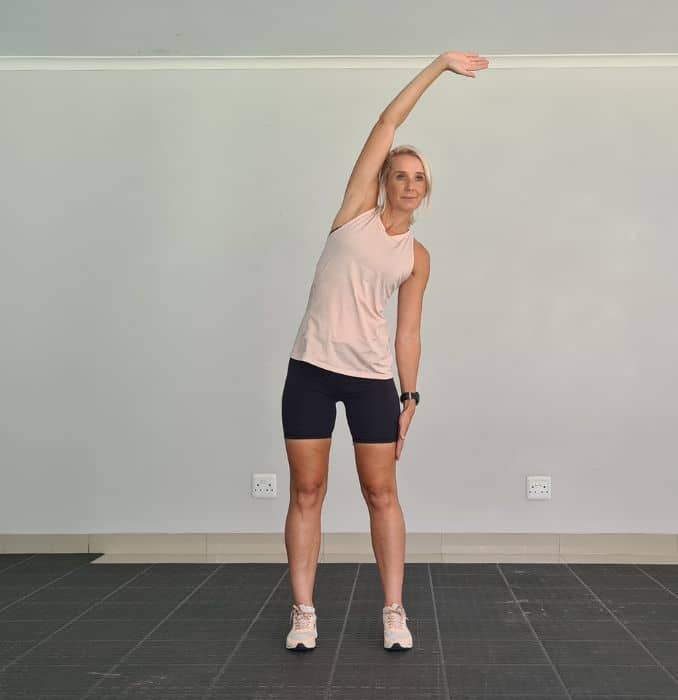 |
Overhead Reach
4. Side Reach
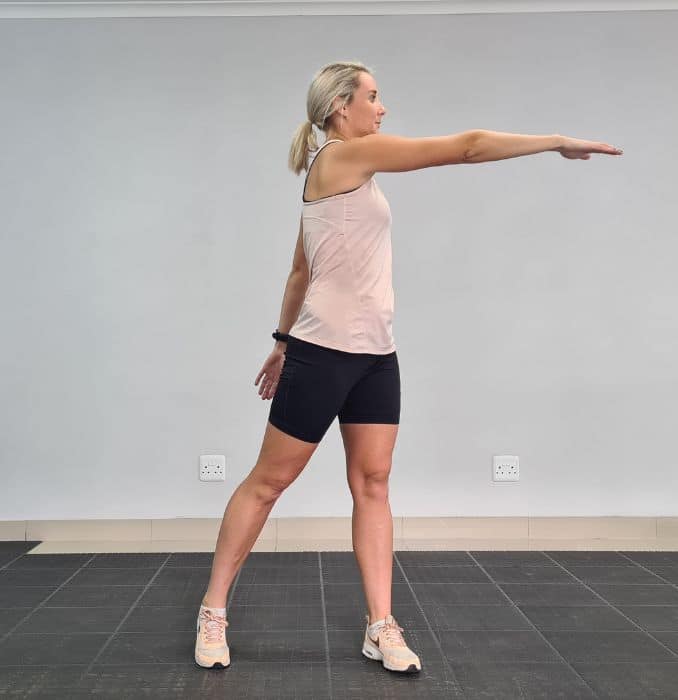
Begin in an upright standing position, feet slightly wider than shoulder-width apart, maintaining good alignment with your head, shoulders, and hips. Engage your core and rotate your upper body to one side, reaching forward with one arm as you lift your opposite heel. Return to the starting position and repeat the movement on the opposite side. Start with 1 set of 5 repetitions in each direction.
 |
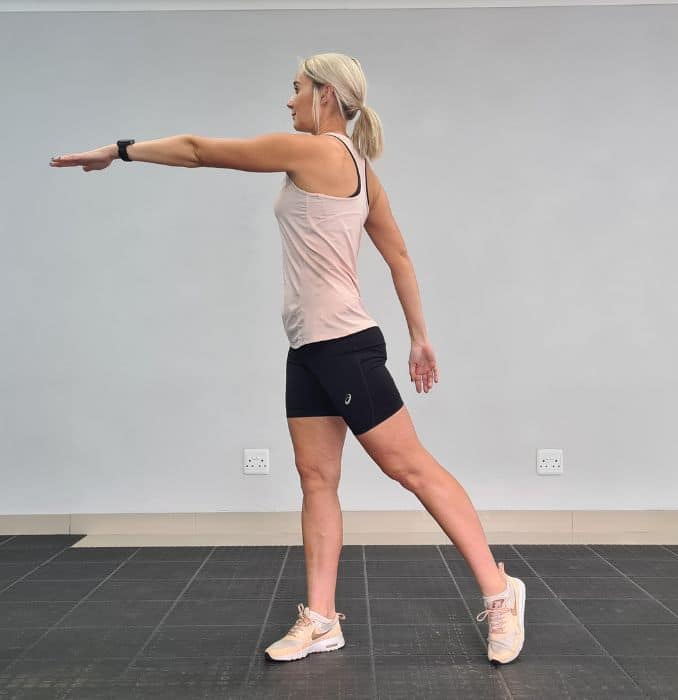 |
Side Reach
Routine
1. Reach and Pull
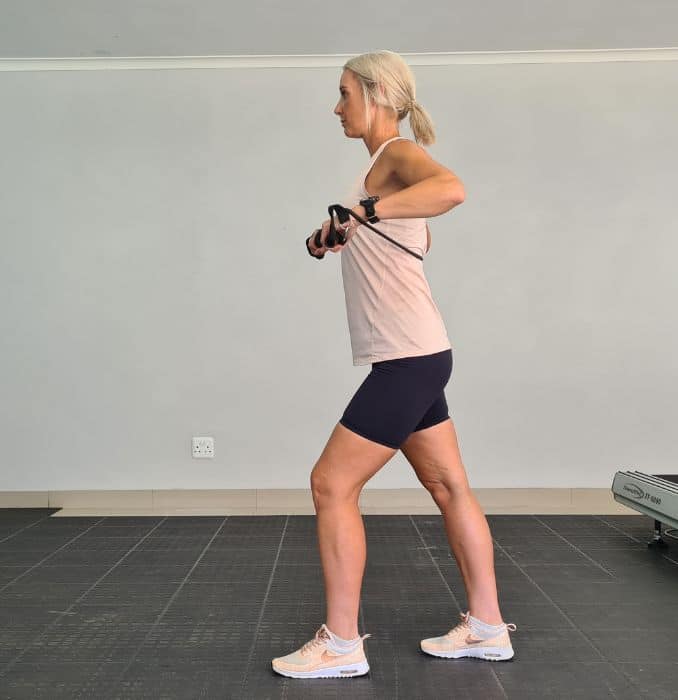
Begin in an upright standing position with your feet shoulder-width apart, maintaining good alignment with your head, shoulders, hips, and legs. Step your left leg forward, bend your knee, and wrap the resistance band behind your upper back, holding the ends of the band in each hand. Engage your core and extend both of your arms in front of your body at chest height, creating resistance on the band. Gently pull your arms back, bringing your elbows out to the sides and squeezing your shoulder blades together at the end position. Return to the starting position and repeat the movement. Start with 3 sets of 15 repetitions.
 |
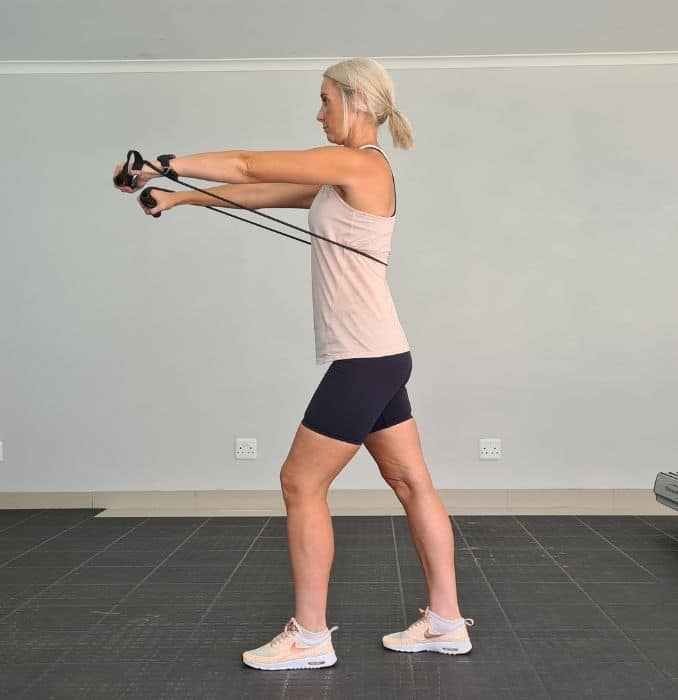 |
Reach and Pull
2. Bend Over Rows
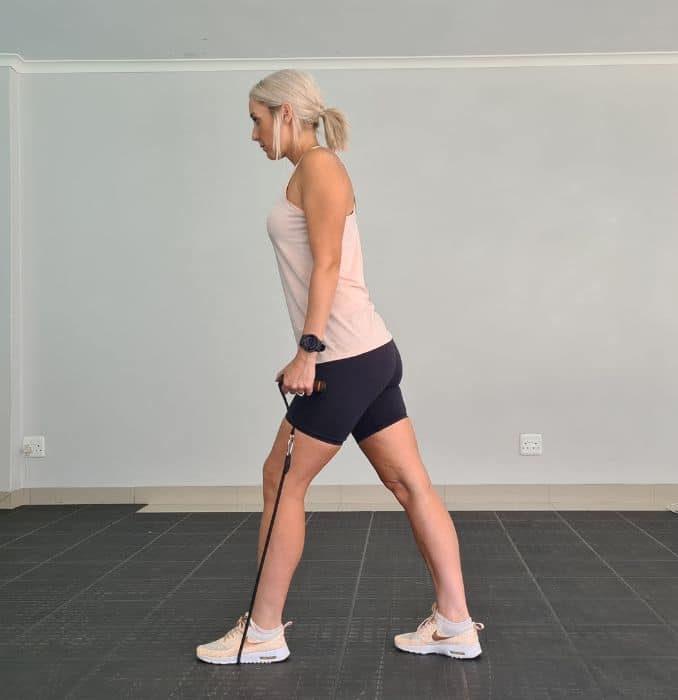
Begin in an upright standing position with your feet hip-width apart, maintaining good alignment with your head, shoulders, hips, and legs. Step your left foot on the center of the resistance tubing and hold the ends of the tubing in each hand. Bend through your hips and front knee, keeping your right leg straight. Engage your core and pull both arms up in a rowing motion, keeping your elbows 30 to 45 degrees away from your body. Return to the starting position and repeat the movement on the opposite foot. Start with 3 sets of 15 repetitions on each side.
 |
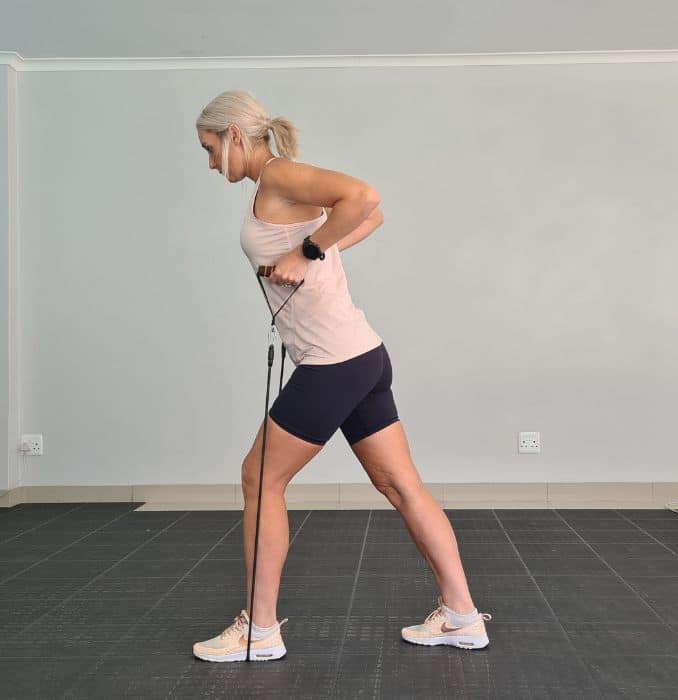 |
Bend Over Rows
3. Bicep Curls
Begin in an upright standing position with your feet hip-width apart, maintaining good alignment with your head, shoulders, hips, and legs. Step on the center of the resistance tubing with your left foot, holding the ends of the tubing in each hand with your palms facing upward. Engage your core and curl both arms to bring the tubing handles to shoulder height. Lower your arms back down to the starting position and repeat the movement. After several repetitions, repeat the movement with your opposite foot forward. Start with 3 sets of 15 repetitions on each side.
 |
 |
Bicep Curls
4. Single Arm Lateral Raise
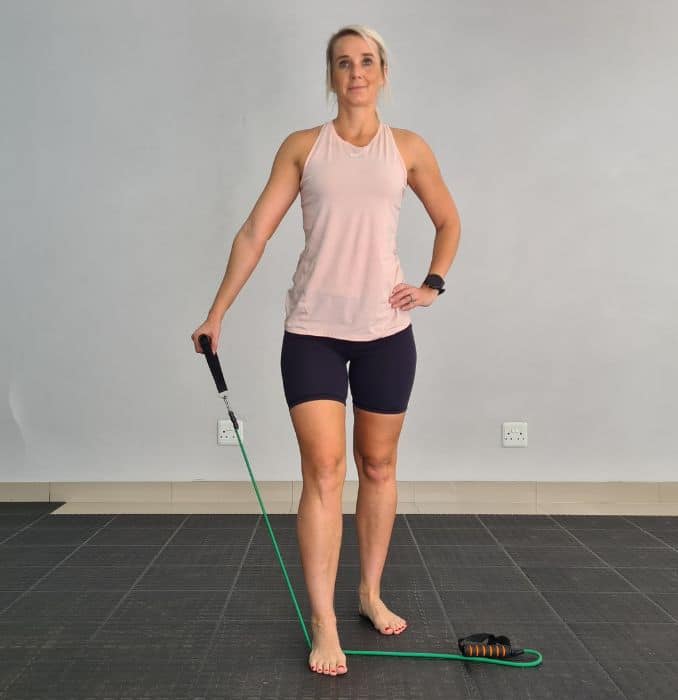
Begin in an upright standing position with your feet shoulder-width apart, maintaining a good alignment with your head, shoulder, hip, and legs. Step on the center of the resistance tubing with one foot and hold a tubing handle in one hand. Engage your core and lift your arm out to the side at shoulder height, creating resistance on the tubing. Lower your arm to return to the starting position. Repeat the movements on the opposite side. Start with 3 sets of 15 repetitions on each side.
 |
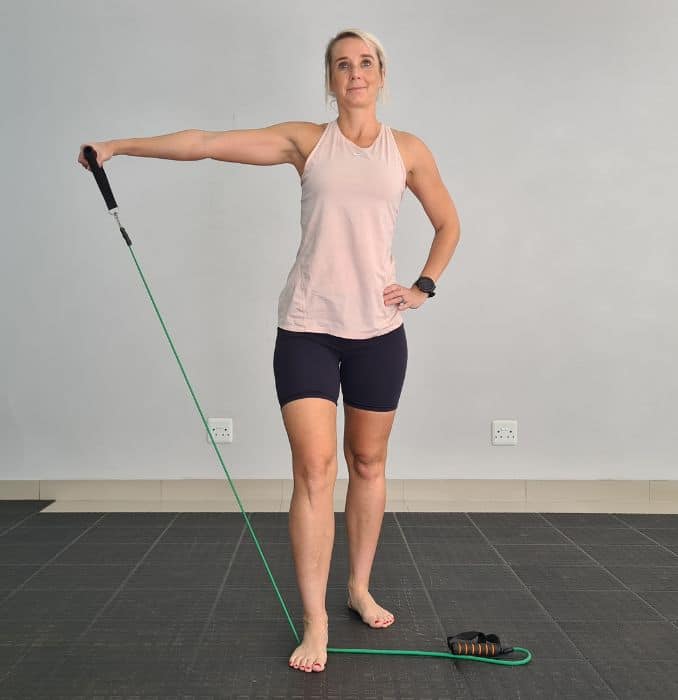 |
Single Arm Lateral Raise
5. Shoulder External Rotation
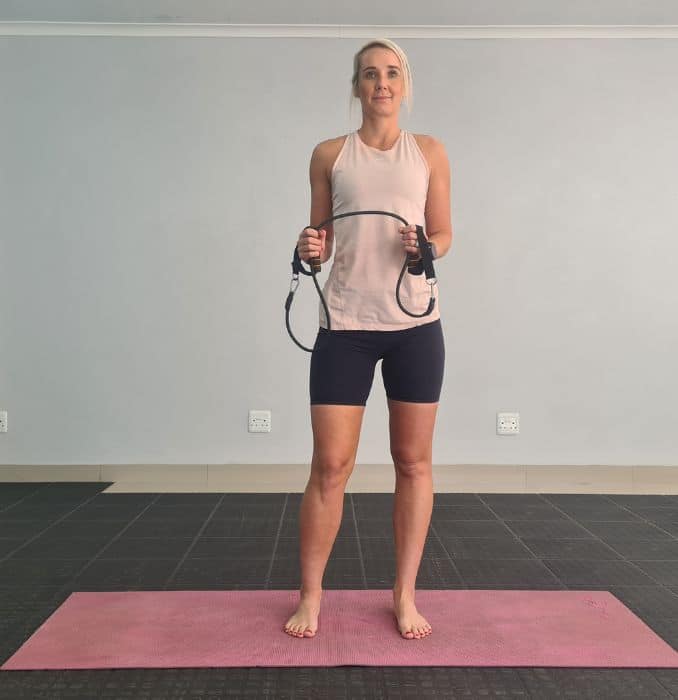
Begin in an upright standing position with your legs straight and feet shoulder-width apart, maintaining good alignment with your head, shoulders, and hips. Bend your arms in front of your body, holding the middle of the resistance band with both hands at chest height. Tighten your core and rotate one arm out to the side, creating resistance on the band while keeping your elbow close to your upper body. Rotate your arm back to the starting position and repeat the movement on the opposite side. Complete 10 repetitions on each arm.
 |
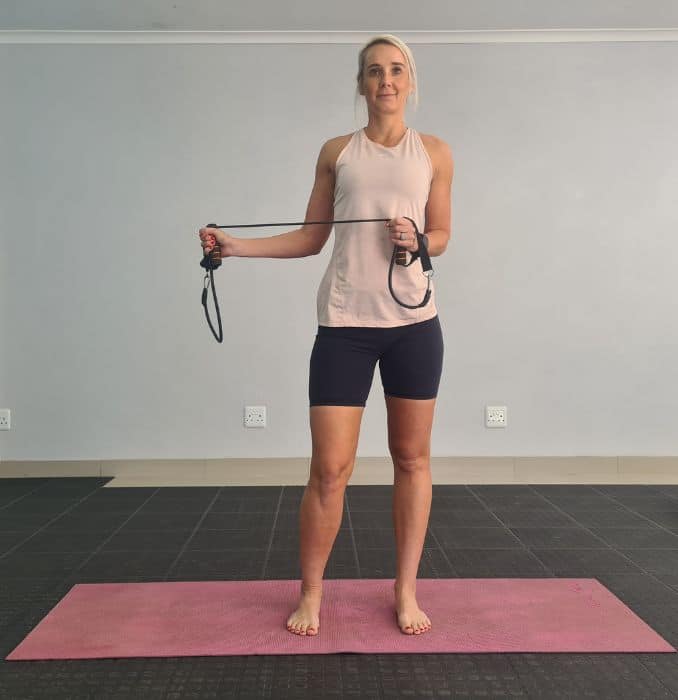 |
Shoulder External Rotation
Cool Downs
1. Triceps Stretch
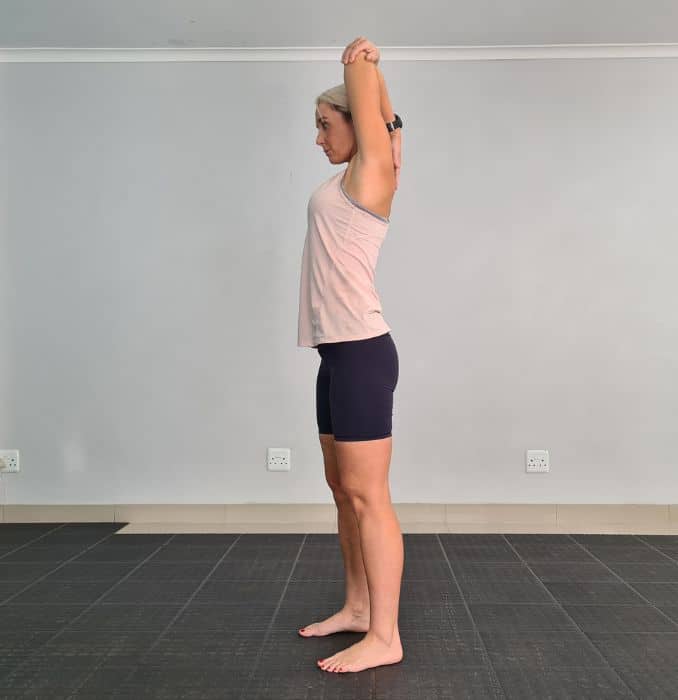
Begin in an upright standing position with your feet shoulder-width apart, maintaining good alignment with your head, shoulders, hips, and legs. Lift one arm overhead, then bend your elbow to bring your hand behind your head. Use your opposite hand to push your elbow further back to intensify the stretch slowly. Hold the end position for 10 seconds and then progress to 20 seconds. Relax and return to the starting position. Repeat the movement on the opposite side.
 |
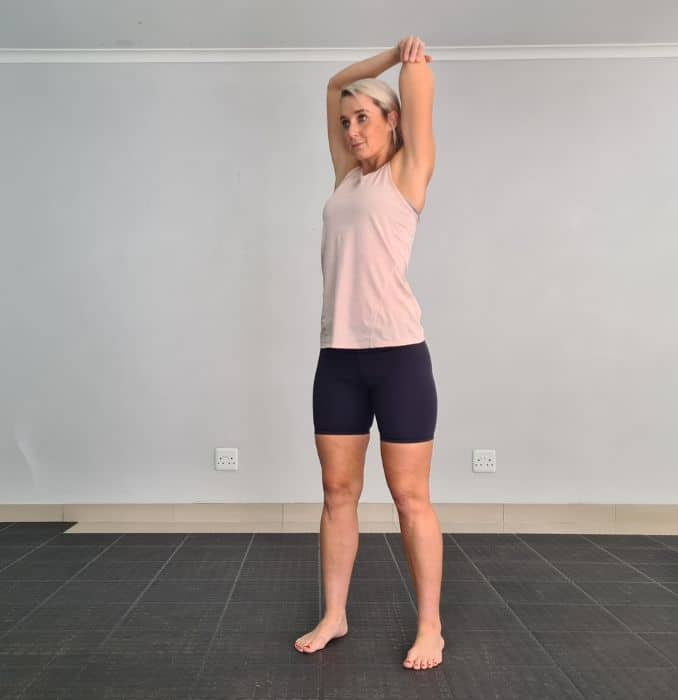 |
Triceps Stretch
2. Cross Arm Stretch
Begin in an upright standing position with your feet shoulder-width apart, maintaining good alignment with your head, shoulder, hips, and legs. Engage your core and cross your left hand over your chest. Intensify the stretch by using your other hand to pull your extended arm closer to your body. Hold this position for 20 seconds. Relax and repeat the movement on the opposite side.
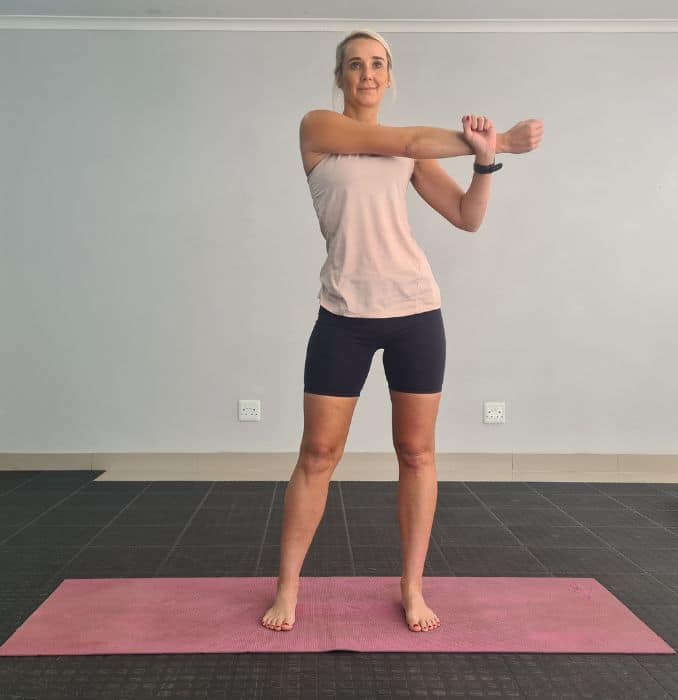
Cross Arm Stretch
3. Back Stretch
Begin in an upright standing position with your feet shoulder-width apart, maintaining good alignment with your head, shoulders, hips, and legs. Place your hands on your lower back or upper pelvis area. Contract your core and arch your back, focusing on the stretch happening in your lower back area. Hold this position for several deep belly breaths through your nose and mouth. Relax and repeat the movement as needed.
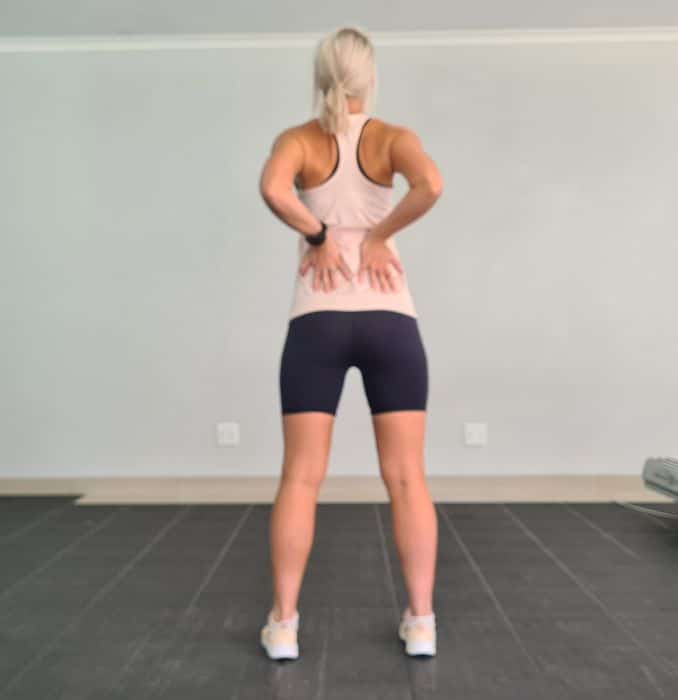
Back Stretch
Variation 1
Begin in an upright standing position with your feet shoulder-width apart, maintaining good alignment with your head, shoulders, hips, and legs. Extend your hands in front of your body at shoulder height and interlace your fingers. Engage your core. Looking for a light stretch on your upper back, pull your arms forward as you drop your chin down towards your chest, rounding out your mid back. Hold this position for a couple of seconds. Relax and return to the starting position.
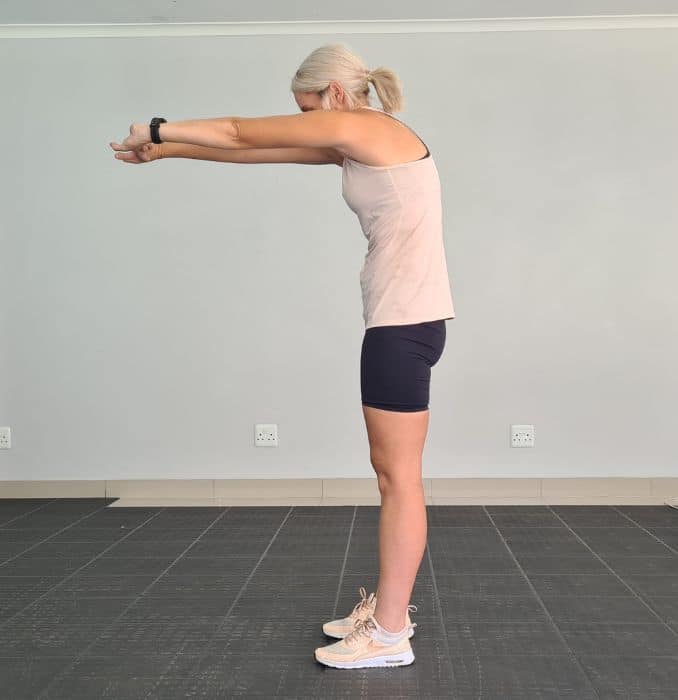
Variation 1
Safety Precautions and Common Mistakes to Avoid

While resistance band stretches are generally safe and effective, it's essential to keep a few safety precautions in mind to avoid injury:
- Regularly inspect your resistance band's condition. Search for indications of damage, like fraying or weakening of the material. Replace any damaged bands to ensure your safety.
- To start your workout routine, it's advisable to begin with gentle cardiovascular exercises like jogging or jumping jacks. These exercises help increase blood flow and condition your muscles for a more intense workout.
- Avoid overstretching the bands. While it's important to challenge your muscles, excessive stretching of the bands can cause them to snap or break. Use bands that provide enough resistance to challenge your muscles without compromising safety.
- Adhere to proper form and technique throughout the exercises. Avoid sudden or rapid movements, as they may cause undue pressure on your joints and increase the chances of injury. Focus on slow and controlled movements, feeling the band's resistance throughout the entire range of motion.
- Pay attention to your body and avoid pushing through pain. If you experience discomfort or pain during an exercise, stop immediately and consult a fitness professional or healthcare provider. It's important to prioritize your safety and well-being.
By following these safety precautions and avoiding common mistakes, you can enjoy the benefits of resistance band stretches while minimizing the risk of injury.
Conclusion and Final Tips for Maximizing the Benefits of Resistance Band Stretches
Integrating resistance band stretches into your workout enhances flexibility, muscle strength, activation, and overall athletic performance. Optimal results come from selecting appropriate bands, aiming for deeper stretch, maintaining proper form, and targeting specific muscle groups. Begin with lighter resistance and progress gradually for safety. Regularly check bands for wear, warm up before exercises, and pay attention to your body to avoid overexertion.
Suitable for beginners and experienced individuals, resistance band stretches provide a versatile and convenient means to elevate your fitness routine. Grab your bands, adhere to proper technique, and elevate your fitness with this effective and accessible workout addition.
Elevate your fitness game with dynamic Resistance Band Stretches! Check our Resistance Band 101 guide before you start – it's your key to unlocking a stronger, more flexible you!


