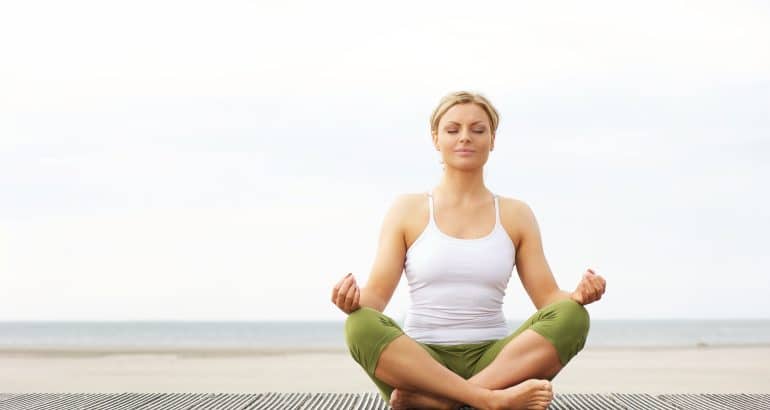
As simple as it sounds, sitting for an extended period can be challenging. Whether you work in an office or tackle a project at home for several hours a day, sitting for long periods can be detrimental to your health. Excess pressure is put on your lumbar spine and intervertebral discs when you sit. This can cause damage over time and lead to tight hips, back pain, or even hernias. However, there are ways to prevent any negative impact from prolonged sitting with the help of yoga.
Yoga and Hip Flexibility
Yoga offers a range of poses that specifically target and improve hip flexibility. Poses like the puppy pose, lizard pose, and half split pose effectively stretch the hip muscles, enhancing their mobility. These poses gently open up the hip joints, releasing any tension or tightness caused by prolonged sitting. Sitting for long periods can lead to tight hip flexors, which can cause discomfort and pain.
This is where yoga becomes valuable in relieving these issues. Incorporating regular yoga into your daily routine can effectively counteract the negative effects of prolonged sitting. Yoga is crucial in elongating and strengthening the muscles around the hips, especially the hip flexor. By consistently practicing these poses, you will gradually experience improved flexibility and mobility in your hips, ultimately enhancing your ability to sit comfortably.
Yoga provides more than just increased hip flexibility. It also offers various benefits that enhance overall comfort while sitting. Engaging in mindful breathing and relaxation exercises during yoga can lower stress levels and improve posture. Proper alignment reduces strain on the hips and other body parts, resulting in a more comfortable sitting experience.
Below are 13 Hip Opening Yoga Poses that you can do to help with your hip flexibility upon sitting all day.
Yoga Stretches for Hip
Warm-Ups
1. Breaths
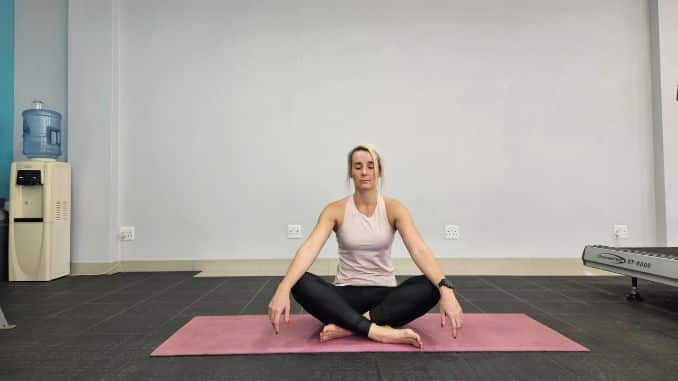
Begin in an upright sitting position on the floor with your legs crossed in front of your body, maintaining good alignment with your head, shoulders, and hips. Place your hands on your knees. Engage your core, then close your eyes and take several deep belly breaths, in through your nose and out through your mouth.
Breaths
2. Head Rotation
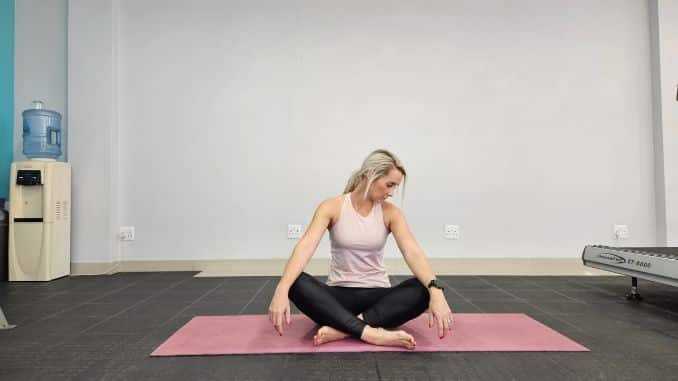
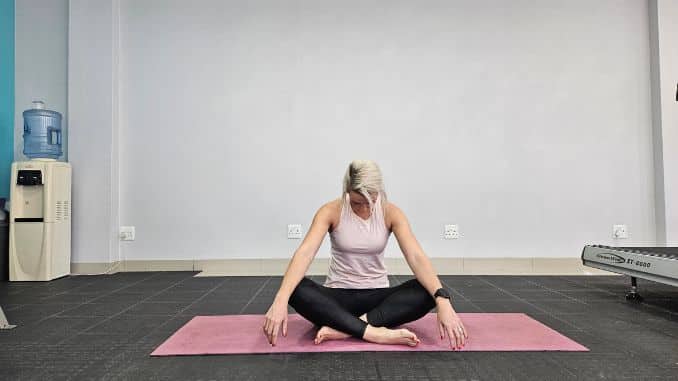
Begin in an upright sitting position on the floor with your legs crossed in front of your body, maintaining good alignment with your head, shoulders, and hips. Place your hands on your knees. Engage your core and gently lower your head to one side. Roll your chin forward, then rotate your head to the opposite side. Take deep breaths throughout the exercise, in through your nose and out through your mouth. Return to the starting position and repeat the movement in the opposite direction.
 |
 |
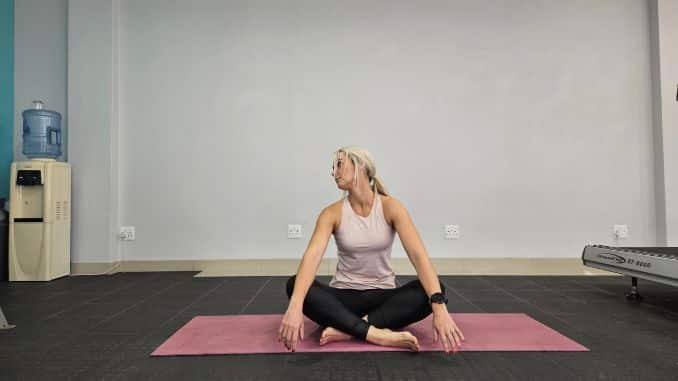 |
Head Rotation
3. Neck Stretch
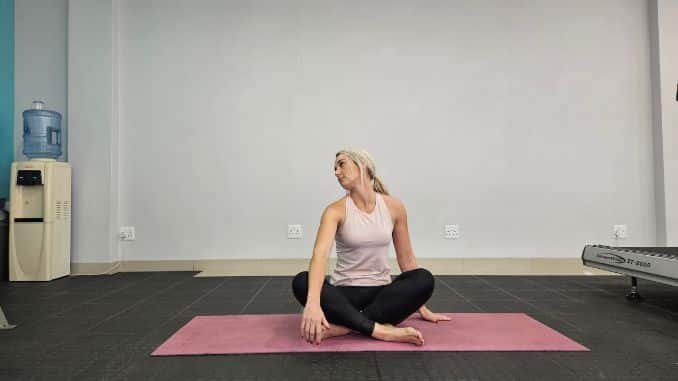
Begin in an upright sitting position on the floor with your legs crossed. Maintain good alignment with your head, shoulders, and hips. Place one hand on the floor for support as you rest your other hand on your knee. Looking for a light stretch along the side of your neck, drop one ear down towards your shoulder. For a deeper stretch, bring your ear closer to your shoulder. Hold this position for several deep belly breaths, in through your nose and out through your mouth. Slowly roll your head to repeat the movement on the opposite side.
 |
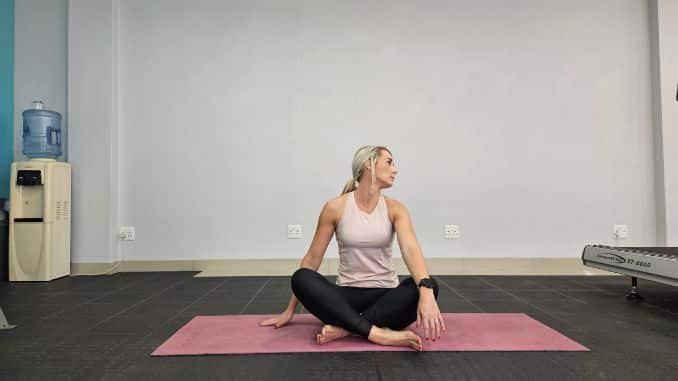 |
Neck Stretch
4. Chest Sweep
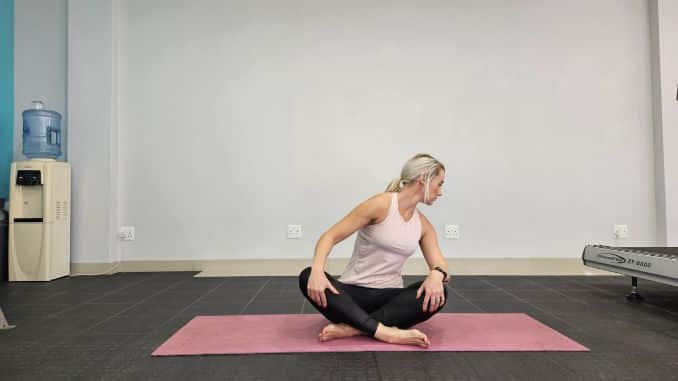
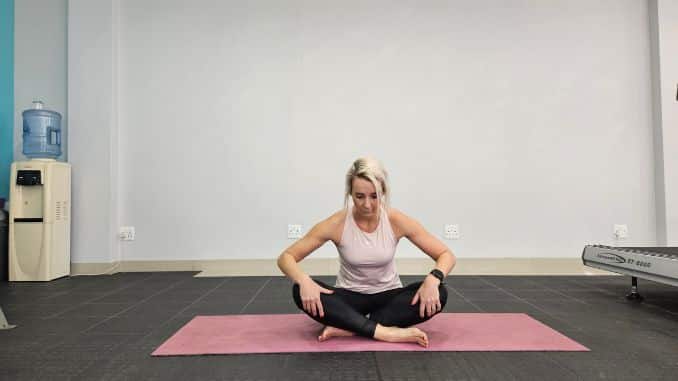
Begin in an upright sitting position with your legs crossed in front of your body, maintaining good alignment with your head, shoulders, and hips. Place your hands on your knees. Engage your core and take a deep belly breath in. Slowly exhale as you lower your chest down to one knee. Slowly swoop your upper body from one knee to your opposite knee, then inhale as you raise back up to an upright sitting position. Reverse the movement in the opposite direction.
 |
 |
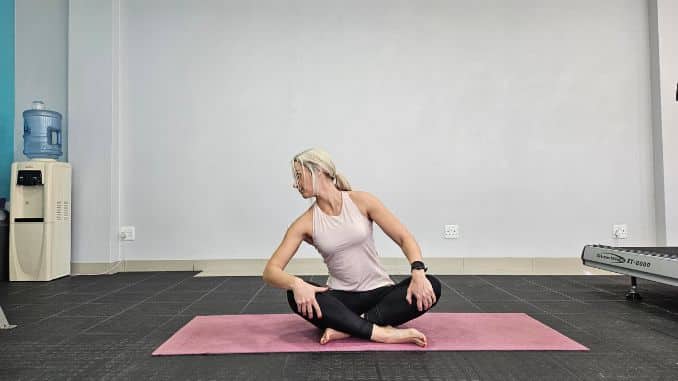 |
Chest Sweep
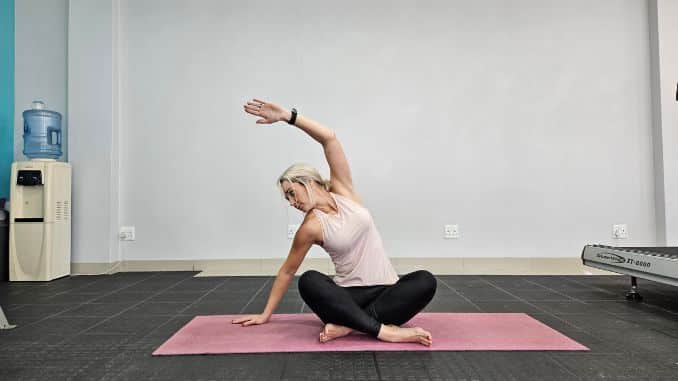
5. Side Bends
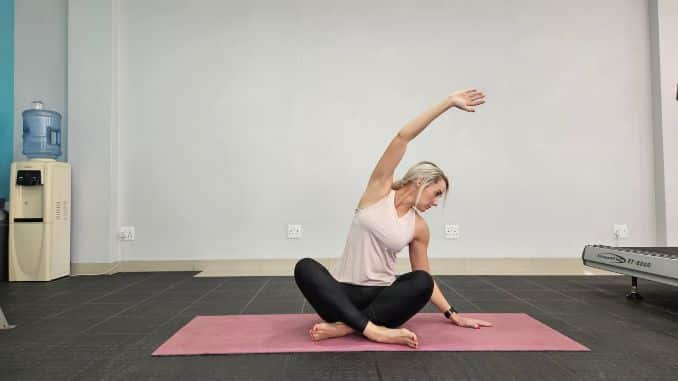
Begin in an upright sitting position on the floor with your legs crossed. Maintain good alignment with your head, shoulders, and hips. Press one hand on the floor by the outer hip for support. Engage your core and inhale as you bend your upper body to the side, reaching over your head with your other arm while keeping your seat flat on the floor. Exhale as you repeat the movement on the opposite side. Repeat the movement for 6 repetitions.
 |
 |
Side Bends
Routines
1. Cat-Cow
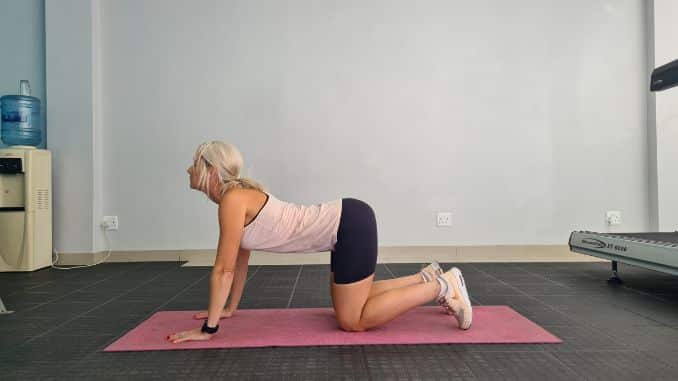
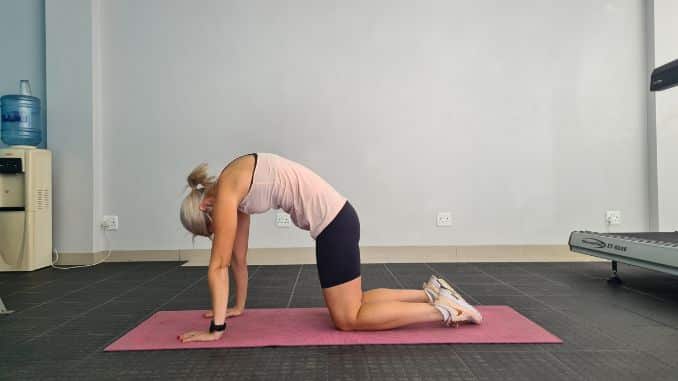
Begin in a 4-point position with your hands beneath your shoulders and your knees under your hips. Maintain good alignment of your head, shoulders, hips, and knees. Engage your core. Arch your back as you tilt your head upward. Then, tuck your tailbone in and round your spine as you lower your head downward. Repeat the sequence of movements. Complete for 5 repetitions.
 |
 |
Cat-Cow
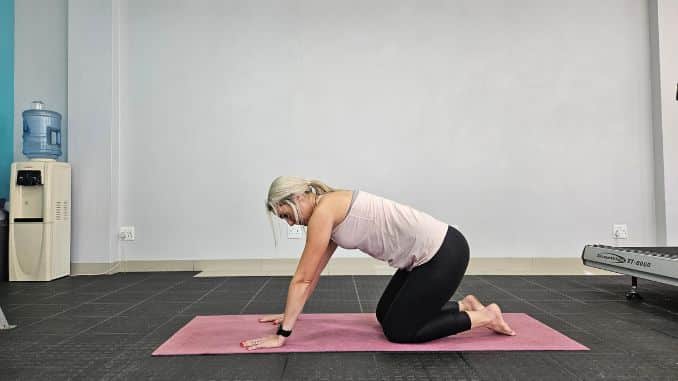
2. Hip & Knee Circles
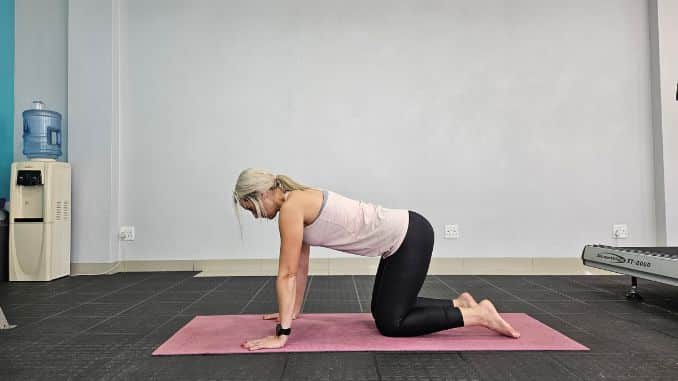
Begin in a 4-point position with your hands beneath your shoulders and your knees under your hips. Engage your core and move your hips in slow circular motions. Repeat the movement in the opposite direction.
 |
 |
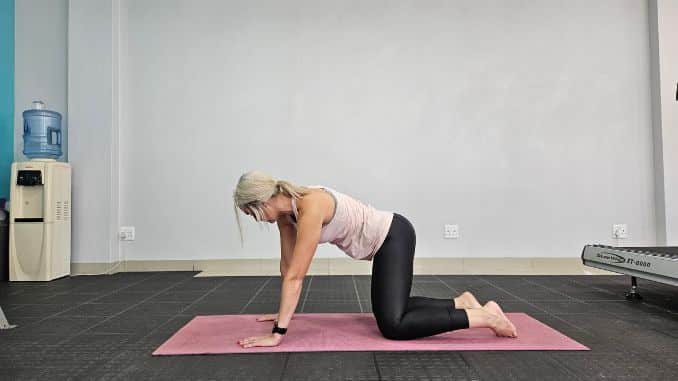 |
Hip & Knee Circles
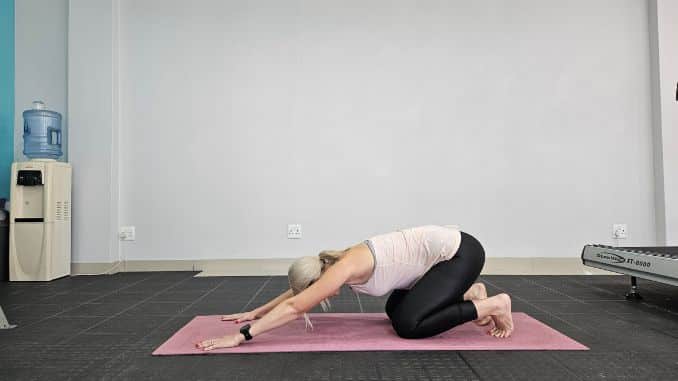
3. Child’s Pose with Modified Plank
Begin in a 4-point position with your hands beneath your shoulders and your knees under your hips. Exhale and shift your hips back to your feet while extending both arms out front. Inhale as you raise back up to move into a modified plank position from the knees. Return to the starting position and repeat the movement sequence for 5 repetitions.
 |
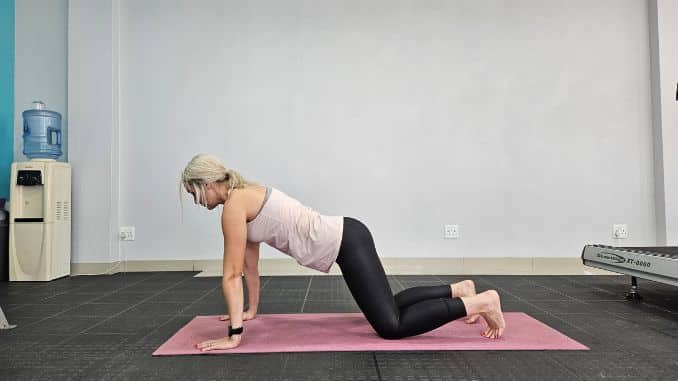 |
Child’s Pose with Modified Plank
4. Puppy Pose
From the end position of Child’s Pose with Modified Plank, walk your hands forward and slowly lower your chest to the floor. Shift your hips upward and rest your chin or forehead on the floor. Hold this position for several deep belly breaths through your nose and mouth. Relax and return to the starting position.
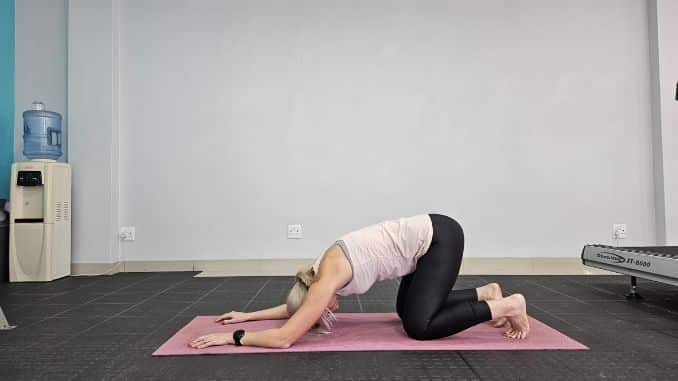
Puppy Pose
5. Lizard Pose
Begin in a 4-point position with your hands beneath your shoulders and your knees under your hips. Take a big step forward with your right foot, planting your foot on the outside of your hands to widen your hips. Engage your core and gently press your palms on the floor with your arms straight while keeping your toes pointing straight ahead. Hold this position for several deep belly breaths, in through your nose and out through your mouth. Repeat the movement on the opposite side.
To make this pose easier, rest your hands on a yoga block while keeping your spine straight.
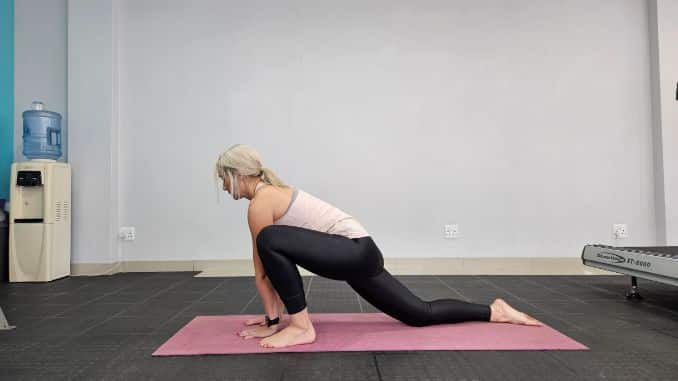
Lizard Pose
6. Half Split
From the Lizard Pose position, move your hips backward as you stack them over your left knee, then extend your right leg while pressing your toes down. Place your right hand outside your right leg for support to straighten your spine. Hold in this position for several deep belly breaths, in through your nose and out through your mouth. Repeat the movement on the opposite side.
To intensify the stretch, you can flex your toes toward the sky to focus the stretch on the hamstrings.
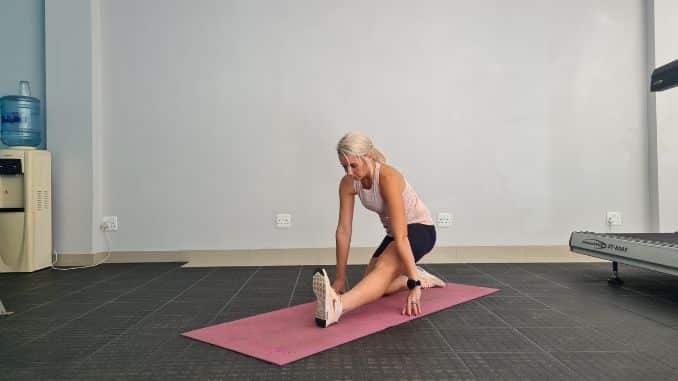
Half Split
7. Table Top Pose Leg to Side
From the Half Split position. Slide your extended leg to the side as you bend your upper body forward with your hands under your shoulders as you keep your spine straight. Hold in this position for several deep belly breaths, in through your nose and out through your mouth. Repeat the movement on the opposite side.
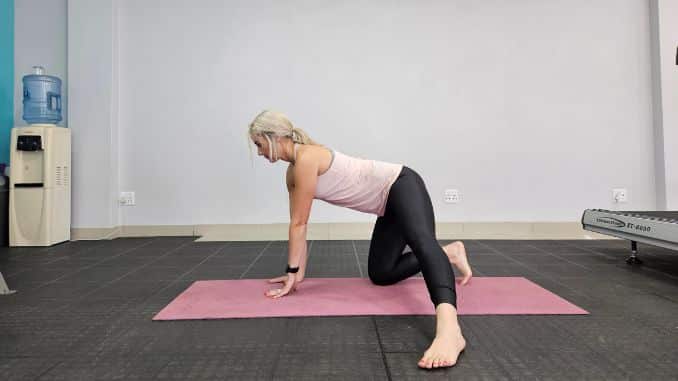
Table Top Pose Leg to Side
8. Child’s Pose
From the Table Top Pose Leg to the Side position, move your extended leg back to a 4-point kneeling position on the floor with your hands under your shoulders and your knees under your hips, wider than hip-width apart. Tighten your abdominal area. Shift your hips back to your feet and extend your arms in front. Drop your forehead on the floor, relaxing your mid-back area for a light stretch. Hold the position for several deep belly breaths in through your nose and out through your mouth.
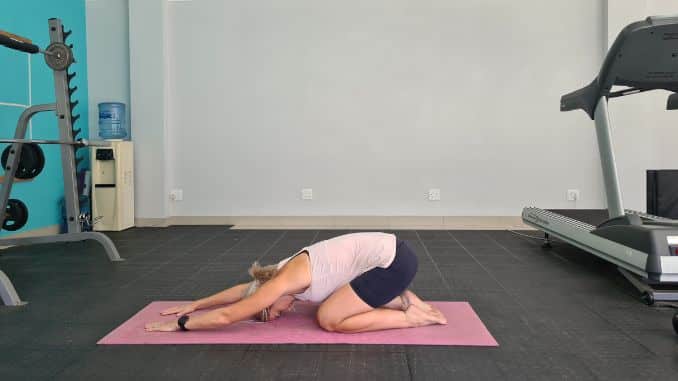
Child’s Pose
9. Wide-Legged Sit & Reach
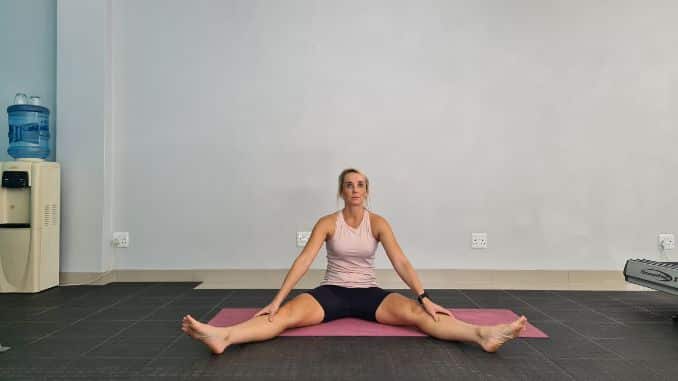
Begin upright on the floor with your legs widened, as wide as you can comfortably go. Maintain good alignment of your head, shoulders, and hips. Engage your core. Place both hands on your right leg, then lower your upper body towards your right leg. Hold the position for several deep belly breaths through your nose and out through your mouth. Return to the starting position and repeat the movement on the opposite side.
 |
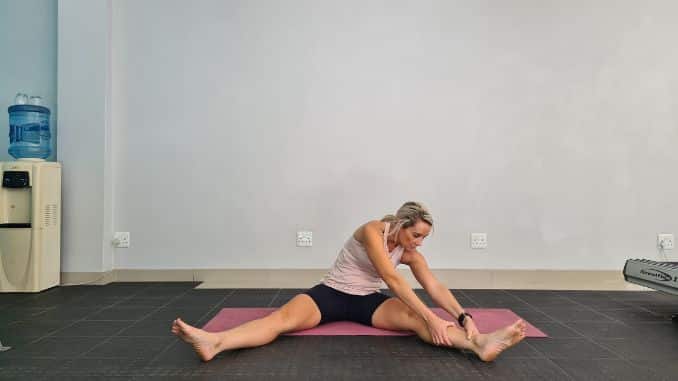 |
Wide-Legged Sit & Reach
10. Side Stretch
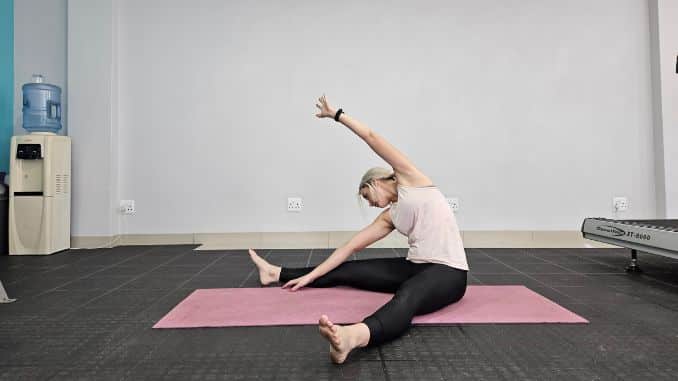
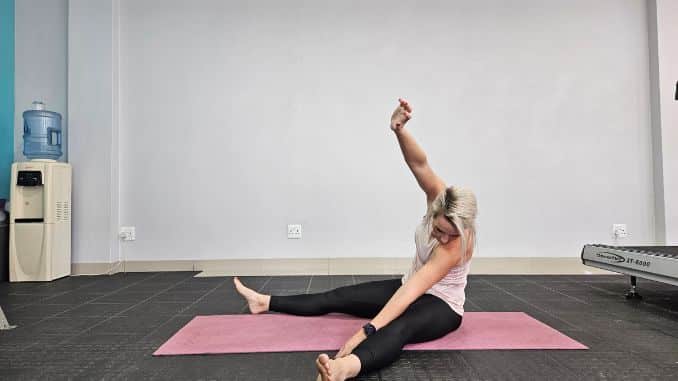
Begin in an upright sitting position on the floor with your legs widened, as wide as you can comfortably go. Maintain good alignment of your head, shoulders, and hips. Engage your core. Place your left hand on the inside of your left thigh. Then, bend your upper body to the left, bringing your right arm overhead. Hold the position for several deep belly breaths, in through your nose and out through your mouth. Return to the starting position and repeat the movement on the opposite side.
 |
 |
Side Stretch
11. Seated Forward Fold with Back Bend
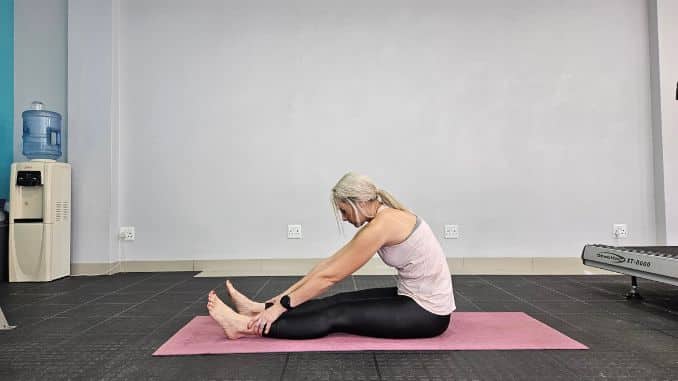
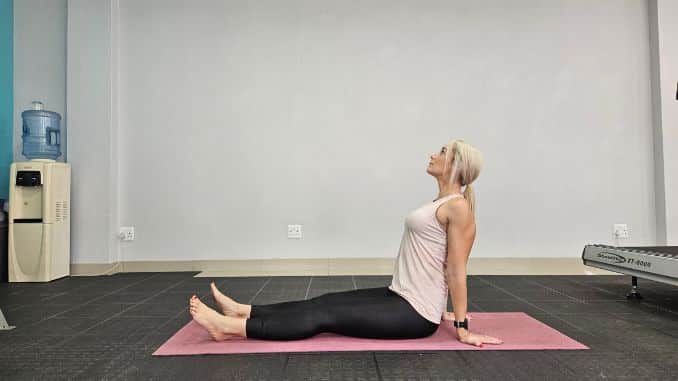
Begin in an upright sitting position on the floor with your legs extended in front. Maintain good alignment of your head, shoulders, hips, and legs. Engage your core, then bend your upper body forward as you place your hands on your lower leg. Hold the position for a couple of seconds. Straighten back up and place both hands behind you with palms pressed on the floor for support, inclining your upper body backward and opening your chest towards the sky. Hold this position for several deep belly breaths, in through your nose and out through your mouth. Relax and move to the neutral position.
 |
 |
Seated Forward Fold with Back Bend
12. Windshield Wiper
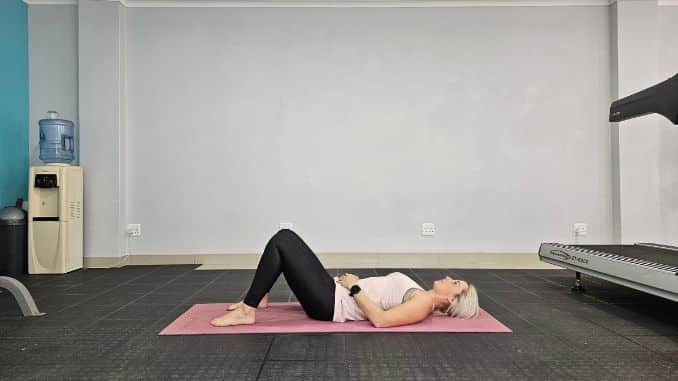
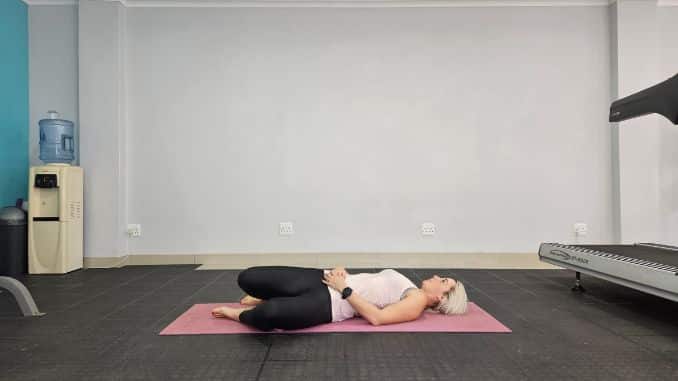
Lie on your back on the floor with your knees bent and your feet flat, relaxing your upper body. Place your hands on top of your belly. Engage your core and lower both knees to one side. Repeat the movement in the opposite direction. Start with 1 set of 5 repetitions on each side.
 |
 |
Windshield Wiper
13. Knees to Chest
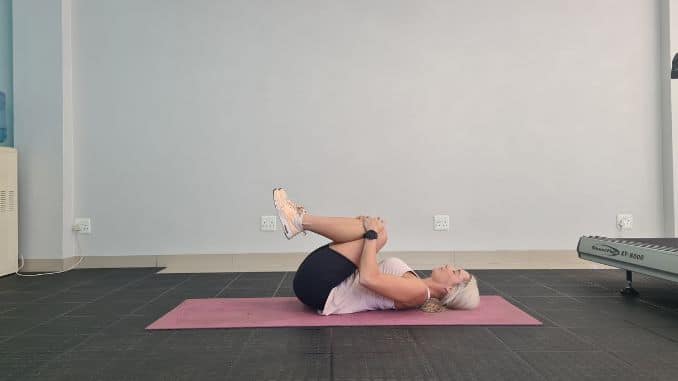
Lie on your back on the floor with your knees bent and your feet flat, relaxing your upper body. Engage your core. Bring both your knees towards your belly and hold onto your knees with both hands. Hold the position for several deep belly breaths in through your nose and out through your mouth.
To intensify this movement, make circular motions with your feet from one direction to the other.
Knees to Chest
Cool Downs
1. Corpse Pose
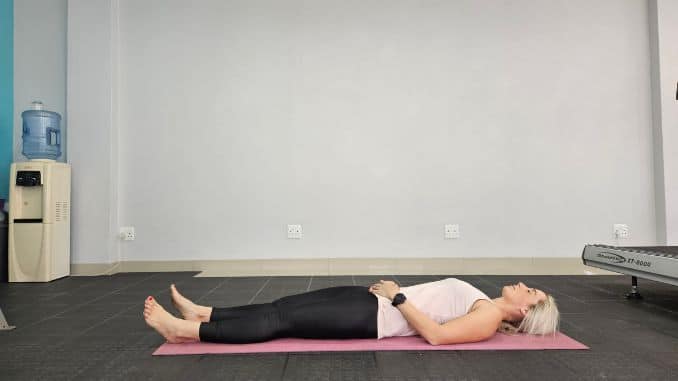
Lie on your back on the floor with your legs stretched out, maintaining good alignment with your head, shoulders, hips, and legs. Place your hands on your belly, then close your eyes and relax your entire body. Hold the position for several deep belly breaths, in through your nose and out through your mouth.
Corpse Pose
2. Side Fetal Pose
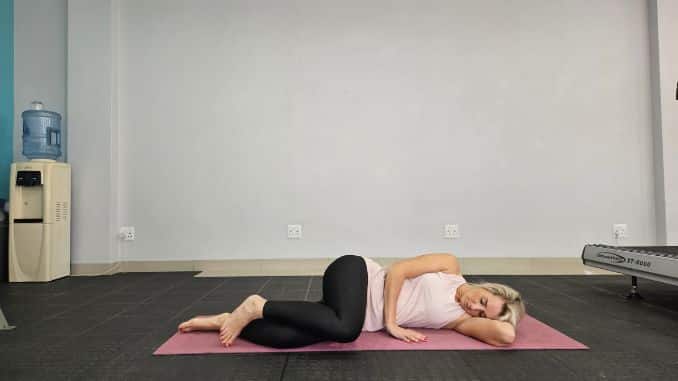
Lie on your side on the floor with your knees bent, maintaining good alignment in your upper body. Bend your bottom arm and rest your head on top while you place your opposite arm in front of your chest for support. Keep your knees closed together. Close your eyes and hold this position for several deep belly breaths, in through your nose and out through your mouth.
Side Fetal Pose
Other Hip Opening Yoga Poses That You Can Try!
A. Pigeon Pose
This pose is a great way to stretch the hip flexors and the inner thighs. To do a pigeon pose:
- Start on your hands and knees.
- Bring your right knee forward and place it on the mat outside your right wrist.
- Slide your left leg back and extend it behind you.
- Lean forward over your right leg, keeping your back straight.
- Hold for 5-10 breaths, then repeat on the other side.
B. Frog Pose
This pose is a deep hip opener that can be challenging but rewarding. To do a frog pose:
- Start on your hands and knees.
- Bring your knees together and sit back on your heels.
- Bring your hands forward and place them on the ground in front of you, shoulder-width apart.
- Lean forward over your knees, keeping your back straight.
- Hold for 5-10 breaths.
C. Wide-Angle Seated Pose
This pose is a great way to stretch the inner thighs and the hips. To do the wide-angle seated pose:
- Sit on the ground with your legs extended in front of you.
- Bend your knees and bring your feet together.
- Extend your arms out to the sides, parallel to the ground.
- Lean forward from your hips, keeping your back straight.
- Hold for 5-10 breaths.
D. Reclining Bound Angle Pose
This pose is a deep hip opener that can be very relaxing. To do a reclining bound angle pose, start lying on your back with your legs extended in front of you. Bend your knees and bring the soles of your feet together. Bring your feet as close to your pelvis as possible. Hold your feet with your hands and gently draw your knees towards your chest. Hold for 5-10 breaths.
-
Fire Log Pose
This pose is a great way to stretch the hip flexors and the groin. To do a fire log pose:
-
- Start on your hands and knees.
- Bring your right knee forward and place it on the mat outside your right wrist.
- Slide your left leg back and extend it behind you.
- Bring your right arm forward and place it on the ground in front of you, shoulder-width apart.
- Lean forward over your right leg, keeping your back straight.
- Extend your left arm up towards the ceiling.
- Hold for 5-10 breaths, then repeat on the other side.
-
Bound Angle Pose
This pose is a deep hip opener that can be challenging but rewarding. To do a bound-angle pose:
-
- Sit on the ground with your legs extended in front of you.
- Bend your knees and bring the soles of your feet together.
- Bring your feet as close to your pelvis as possible.
- Hold your feet with your hands and gently draw your knees towards the ground.
- Hold for 5-10 breaths.
-
Cobbler's Pose
This pose is a variation of the bound angle pose that is easier to do. To do the cobbler's pose, sit on the ground with your legs extended in front of you. Bend your knees and bring the soles of your feet together. Bring your feet as close to your pelvis as possible. Rest your forearms on your thighs and lean forward from your hips, keeping your back straight. Hold for 5-10 breaths.
-
Reclining Figure – 4 Pose
This pose is a variation of the reclining bound angle pose that is easier to do. To do the reclining figure-4 pose, start lying on your back with your legs extended in front of you. Bend your knees and bring the soles of your feet together. Bring your feet as close to your pelvis as possible. Cross your right ankle over your left thigh and hold your right foot with your left hand. Gently draw your right knee towards your chest. Hold for 5-10 breaths, then repeat on the other side.
-
Half Lord of the Fishes Pose
This pose is a great way to stretch the hip flexors, the spine, and the shoulders. To do half lord of the Fishes pose:
-
- Start sitting on the ground with your legs extended in front of you.
- Bend your right knee and bring your right foot to the outside of your left thigh.
- Bring your left hand to the ground behind you and your right hand to your right hip.
- Twist your torso to the right, bringing your right arm overhead.
- Hold for 5-10 breaths, then repeat on the other side.
These are just a few of the many hip-opening yoga poses you can try. It is important to listen to your body and not push yourself too hard when doing these poses. If you feel any pain, stop the pose and modify it or come out of it completely. With regular practice, you will start to see and feel the benefits of these poses for your hips.
The Benefits
Sitting for long periods can put a lot of strain on the hips, leading to tightness and pain. Yoga poses can help to improve hip flexibility and reduce pain by stretching the hip flexors, the muscles that connect the front of the thigh to the hip.
Here are some of the benefits of doing yoga poses for hip flexibility, especially for people who sit all day:
1. Improved Hip Flexibility
As mentioned, yoga poses can help stretch the hip flexors, improving hip flexibility. This can make it easier to move through the day without pain and help prevent injuries.
2. Reduced Hip Pain
If you are experiencing hip pain, yoga poses can help to relieve it. The gentle stretching of the hips can help to relax the muscles and reduce inflammation.
3. Improved Posture
Yoga poses can help to improve posture by strengthening the muscles in the back and abdomen. This can help to keep the spine in alignment and reduce back pain.
4. Reduced Stress
Yoga is a great way to reduce stress. The gentle movements and focused breathing can help to calm the mind and body.
5. Increased Range of Motion
Yoga poses can help to increase the range of motion in the hips. This can make it easier to do everyday activities, such as walking, running, and getting up and down from a chair.
Conclusion
In conclusion, the importance of hip flexibility cannot be overstated. Tight hips can lead to many problems and limitations in our daily lives. The hip muscles, especially the hip flexors, play a crucial role in maintaining proper posture, stability, and range of motion in the hip joint. Hip-opening stretches are an excellent way to improve hip flexibility. These stretches specifically target the hip muscles and help release tension and tightness in the hip joint. By incorporating these stretches into our regular exercise routines or daily activities, we can gradually improve our hip flexibility.
Furthermore, working to both stretch and strengthen the hip muscles is essential. While stretching helps lengthen the muscles and increase their flexibility, strengthening exercises, particularly those targeting the gluteal muscles, provide stability and support to the hip joint. The gluteal muscles play a vital role in maintaining proper hip alignment and preventing compensatory movements that can lead to strain and injury.
By prioritizing hip flexibility, we not only enhance our physical performance in activities such as sports, but we also promote better posture, alleviate lower back pain, and reduce the risk of hip joint injuries. Ultimately, maintaining and improving hip flexibility is a valuable investment in our overall well-being and quality of life.

