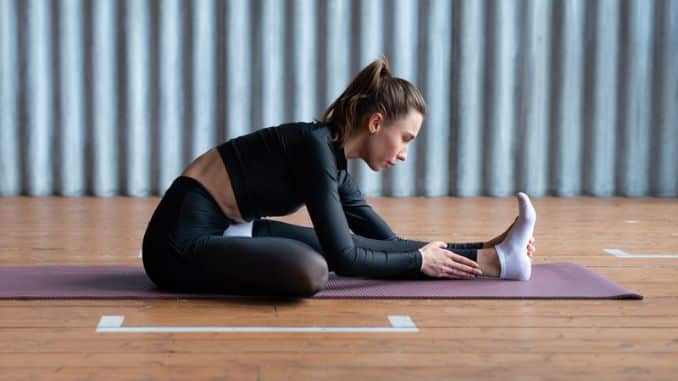
Practicing gentle yoga poses for tight hips is a fantastic way to maintain hip health. It can help you get strong, flexible hips and reduce hip pain and inflammation, improving your overall physical performance and making you less likely to get hurt. Regular yoga can protect your hips from injury, especially if you are prone to falling.
Explore some of the best yoga poses for tight hips and how you can incorporate them into your yoga class or your daily routine. So, roll out your yoga mat, and let's get started on the path to strong, supple hips!
Understanding The Importance of Healthy Hips
The Crucial Role of your hips
- Your hips are responsible for bearing the weight of your body.
- Your hip joint allows you to execute a wide range of movements.
- When your hips are healthy and strong, you'll find that your movements are smoother and more fluid.
Bases of Strong and Weak Hip Muscles
As we age, our hips can become weaker and more prone to injury, making it harder to do the things we love and leading to a loss of independence. Yoga poses like downward-facing dog and half-pigeon can be beneficial in alleviating weak and tight hips.
Based on scientific research, several factors can contribute to tight hips and hip pain, including:
- Sedentary lifestyle: This can contribute to chronic low back pain. When we spend too much time sitting or lying, our muscles in the hips become weak and stiff, causing chronic low back pain and making it harder to move around. Joining yoga classes or practicing yoga poses at home can help loosen those tight hips.
- Lack of exercise: Regular exercise is essential for maintaining strength and flexibility in our hips. Remember exercise is one of the most effective ways to boost mental health. And It is an effective treatment for generalized anxiety disorder.
- Aging: This stage in life can weaken our bones and muscles, losing strength and stability in our hips.
- Poor posture: When we slouch, it can put extra strain on our hips and cause them to weaken.
- Injuries: Fractures or sprains can cause damage to the muscles and bones around the hip joint, leading to weakness and pain.
On the other hand, strong, flexible hips…
- prevent injury
- improve your balance and stability
- enhances your athletic performance and physical activity
Yoga Poses to Strengthen Your Hips
Move into a low lunge with your left knee on the floor and your right foot forward. Ensure that your left leg is extended behind you and your left foot is pointed directly back. Bring your left hand to your left knee, then gently press your hips forward, feeling the stretch through your left hip.
If you feel comfortable, lift your left arm and reach towards the sky, lengthening through your left side. Slowly shift your weight back and bring your left ankle towards your left hip, coming into a half-pigeon pose. Gently walk your hands forward and take a few deep belly breaths, in through your nose and out through your mouth. Rest your forehead on your hands or a block if it feels good.
To deepen the stretch, tuck your left toes in and lift your left knee off the ground, coming into a full pigeon pose. Hold the position for a few more breaths, feeling a stretch through your left hip and opening up your chest.
This is what happens when your hips are weak or tight.
- Stoop, which can cause back pain and other discomforts.
- Contribute to knee and ankle injuries, as these joints must compensate for the lack of support from the hips.
The good news is that there are things we can do to prevent weak hips and maintain our mobility as we age.
- Regular exercise, including strength training and stretching, can help keep our hips strong and flexible.
- Healthy diet. Healthy eating, including high-fiber foods and foods rich in calcium and vitamin D, can help keep our bones strong and prevent fractures.
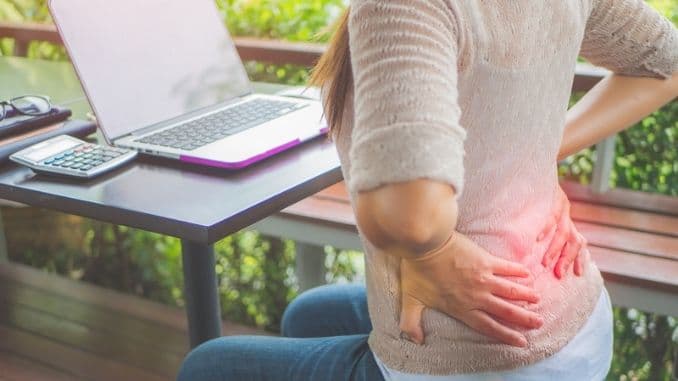
Common hip issues and how practicing yoga can help address them
Regular yoga practice can be an effective way to address and alleviate common hip issues.
Most common hip issues:
1. Tight hip flexors or tight hips
Lunges, Full and Half Pigeon, Warrior I, and II can help lengthen and stretch the hip flexors.
2. Hip bursitis
Child's Pose, Reclining Bound Angle, and Seated Forward Fold can help stretch the muscles and tendons around the hips.
3. Hip arthritis
Warrior II, Triangle, and Tree pose are great for hip strengthening.
You can also count on the Arthritis Foundation, which provides helpful resources and support for those with hip arthritis.
4. Sciatica
Downward-Facing Dog, Seated Forward Fold, and Pigeon pose can help relieve pressure on the sciatic nerve.
Whether a home or yoga class practice can be a highly effective way to address common tight hips and other hip problems. Yoga classes can be a wonderful way to alleviate chronic pain and promote healthy hips.
Improving hip flexibility, strength, and balance
Suppose you're experiencing shooting pain in your hips. Healthcare research suggests practicing good posture and incorporating yoga to promote hip health and ease discomfort.
How?
- By stretching and opening up the muscles in the hips. Yoga can help to alleviate this discomfort by targeting the muscles surrounding the hips, including the hip flexors, glutes, and hamstrings.
- Strengthening your hips' muscles can help improve your balance and stability. Yoga poses that require you to balance on one leg, such as tree pose, can help to strengthen the muscles in your hips and improve your balance.
- By increasing body awareness and coordination. Yoga poses that require you to shift your weight, such as Warrior III, can help to improve your balance by challenging your body to maintain stability.
Benefits of regular yoga Class or Practice
Regular practice, particularly hot yoga, can work wonders for your hip flexors and overall hip health, making it a valuable addition to your integrative medicine routine.
These are some immeasurable benefits of yoga:
- Improves women's health, especially in breast cancer as yoga reduces stress and improves relaxation.
- considered an integrative medicine
- strengthen and tone the gluteal muscles
- lose weight
- alleviate tight hips
- stress management
- manage body weight
- correct poor posture
- help high blood pressure
- assist anxiety disorder
- depressive symptoms
- fall asleep quickly
- supports healthy eating
- helpful for recovering from a broken hip
Several postures can be especially effective, regardless of limitations or past injuries like a broken hip.
Moreover, here are the MOST effective yoga poses for hips:
Yoga Poses for Healthy Hips
Practicing these yoga poses can be an encouraging way to alleviate chronic low back pain including tight hips. It is yoga's impact that can assist your gluteal muscles and help you find strength and stability in the outer edge of your hips.
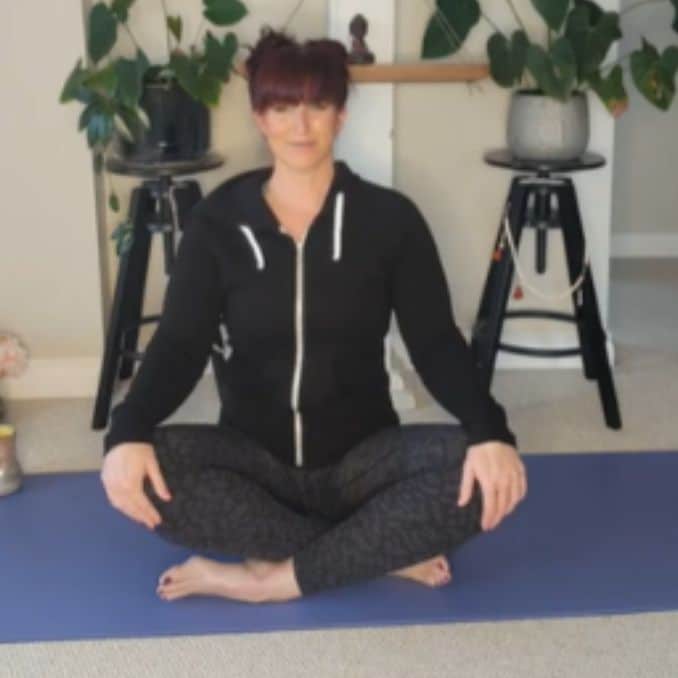
1. Breaths
Begin in an upright sitting position with your legs crossed, maintaining good alignment with your head, shoulders, and hips. Place your hands on your knees and take several deep belly breaths, in through your nose and out through your mouth.
Breaths
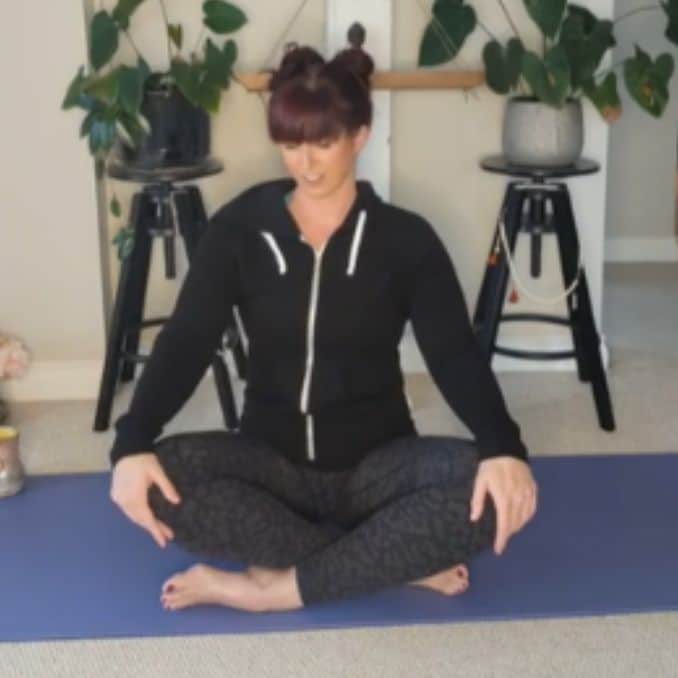
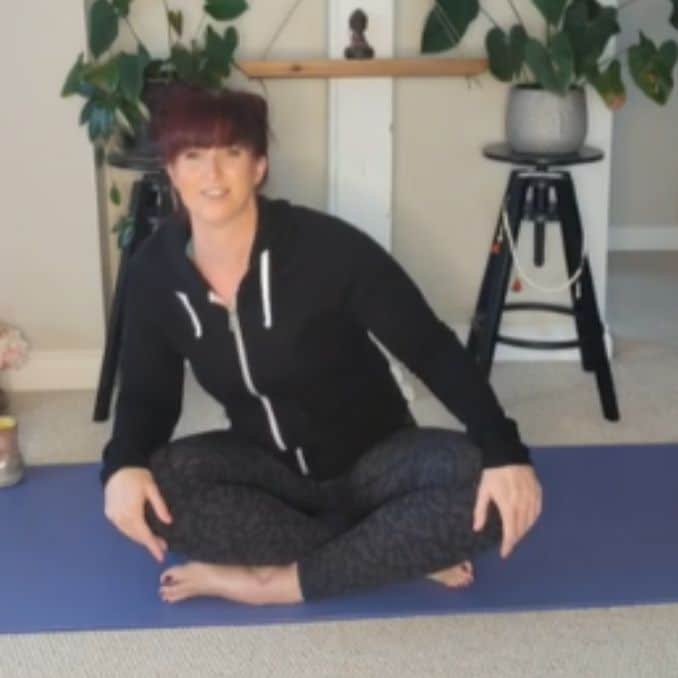
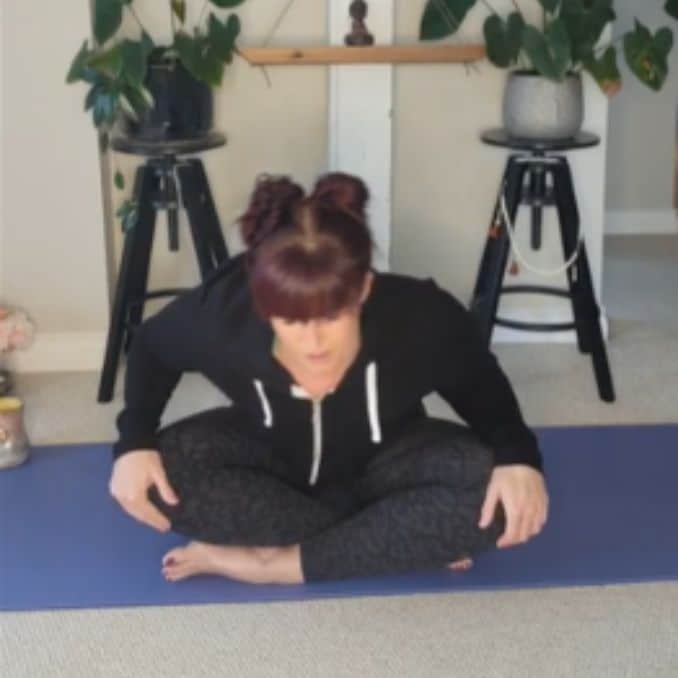
2. Seated Hip Circles
Begin in an upright sitting position on the floor with your legs crossed, maintaining good alignment with your head, shoulders, and hips. Place your hands on your knees. Engage your core and move your upper body in a significant circular motion. Relax and repeat the movement. Start with 5 repetitions in each direction.
 |
 |
 |
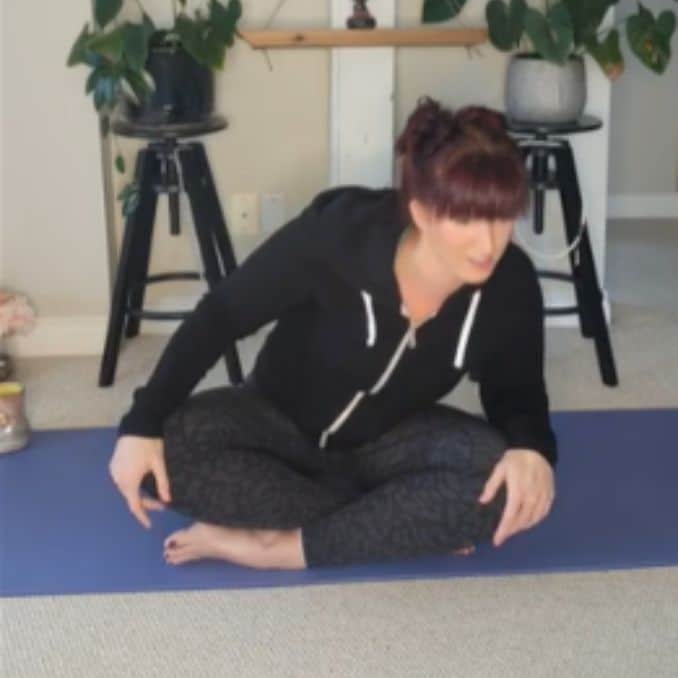 |
Seated Hip Circles
3. Seated Forward Fold
Begin in an upright sitting position on the floor with your legs crossed, maintaining good alignment with your head, shoulders, and hips. Tighten your abdominal area, then hinge through your hips to bend your upper body forward, relaxing your mid-back area for a light stretch. Take a couple of deep belly breaths in through your nose and out through your mouth. Hold this position for 10 seconds. Return to the starting position
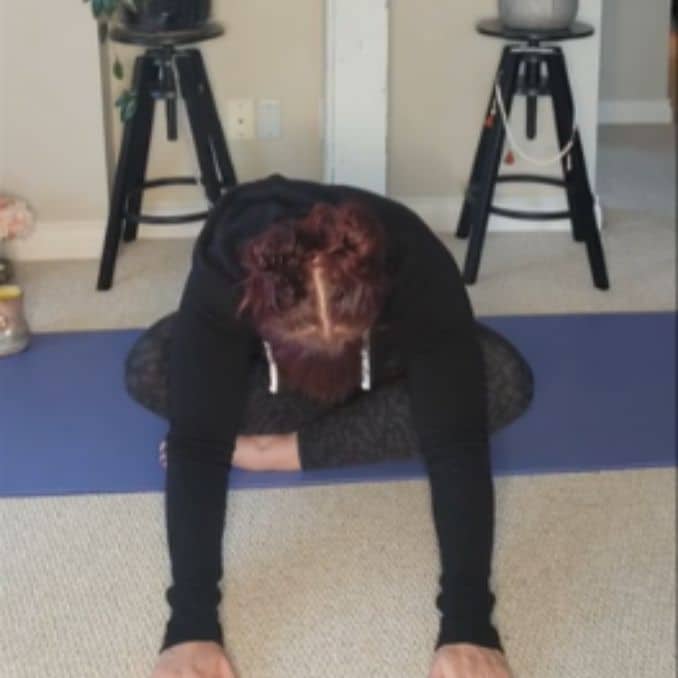
Seated Forward Fold
4. Progressive Exercises
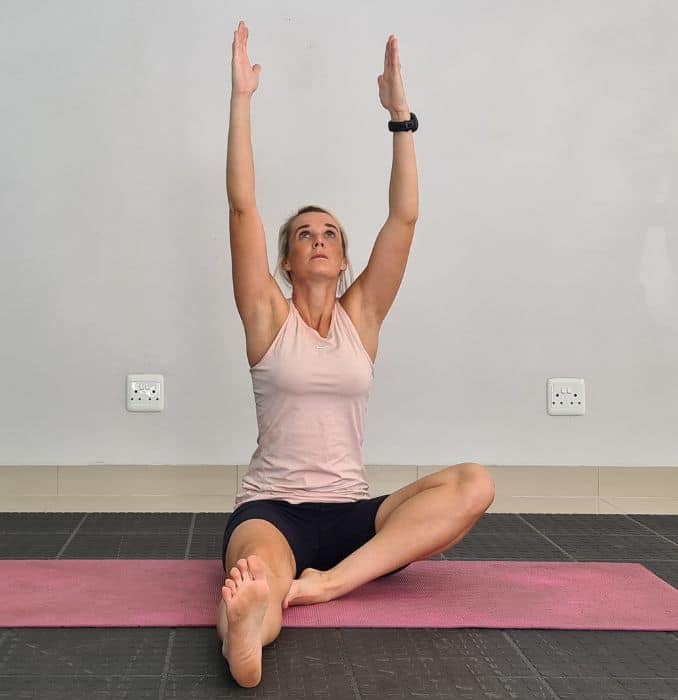
a. Seated Single Leg Forward Fold
Begin in an upright sitting position on the floor with your legs extended in front of your body, keeping your toes pointing upward. Maintain good alignment with your head, shoulders, and hips. Bend one knee and position your foot against the inner thigh of your extended leg. Engage your core and raise both arms overhead, then slowly hinge through your hips to bend your upper body forward with your hands reaching the stretched leg. Take a couple of deep belly breaths in through your nose and out through your mouth. Hold this position for 10 seconds.
 |
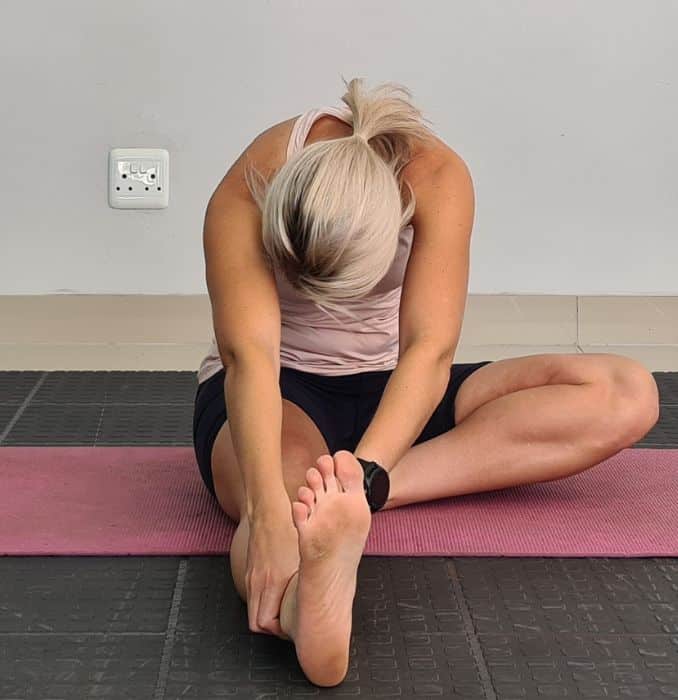 |
Seated Single Leg Forward Fold
b. Seated Single Leg with Side Bend
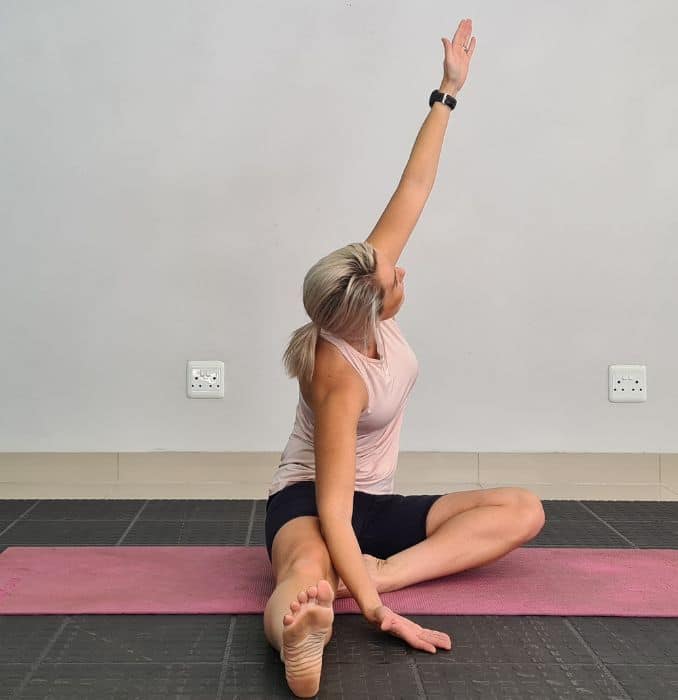
From the end position of the Seated Single leg Forward Fold, engage your core and place your right hand on the floor with your palm facing upward. Tend to twist your upper body to the side as you reach overhead with your opposite hand, then bend your upper body to the side with your hand reaching overhead. Take a couple of deep belly breaths in through your nose and out through your mouth. Hold this position for 10 seconds.
 |
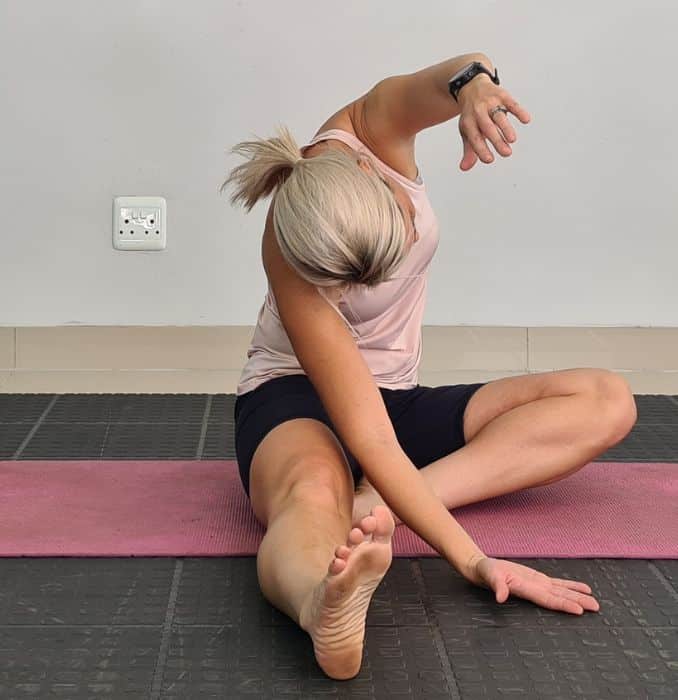 |
Seated Single Leg with Side Bend
c. Seated Twist
From the end position of the Seated Single Leg with Side Bend. Cross the bent leg over to the stretch leg. Wrapping one arm around the bent knee for support. Engage your core and twist your upper body to the side with your head facing the back. Take a couple of deep belly breaths in through your nose and out through your mouth. Hold this position for 10 seconds.
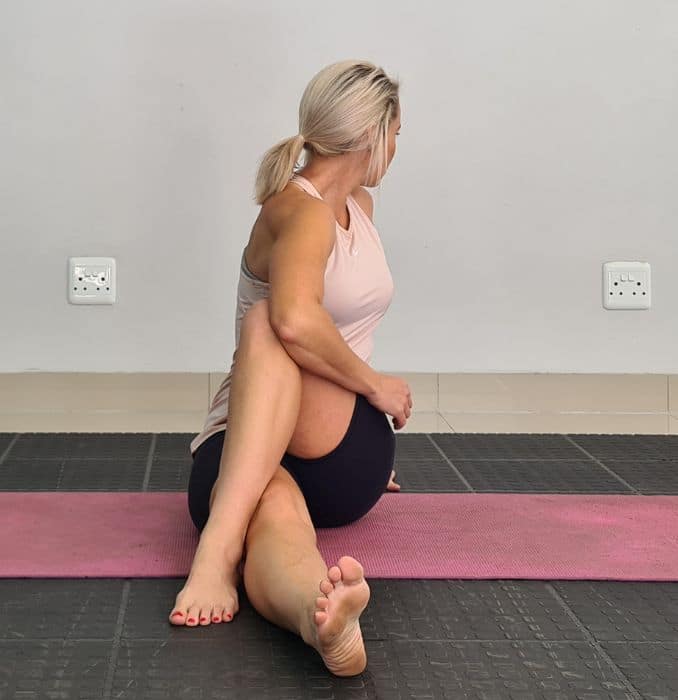
Seated Twist
d. Forward Fold with Single Knee Bend
From the end position of the Seated Twist. Turn your upper body in front and wrap your bent knee with both hands. Engage your core and slowly hinge through your hips to bend your upper body forward with your head facing down to the floor. Take a couple of deep belly breaths in through your nose and out through your mouth. Hold this position for 10 seconds. Relax and return to an upright sitting position.
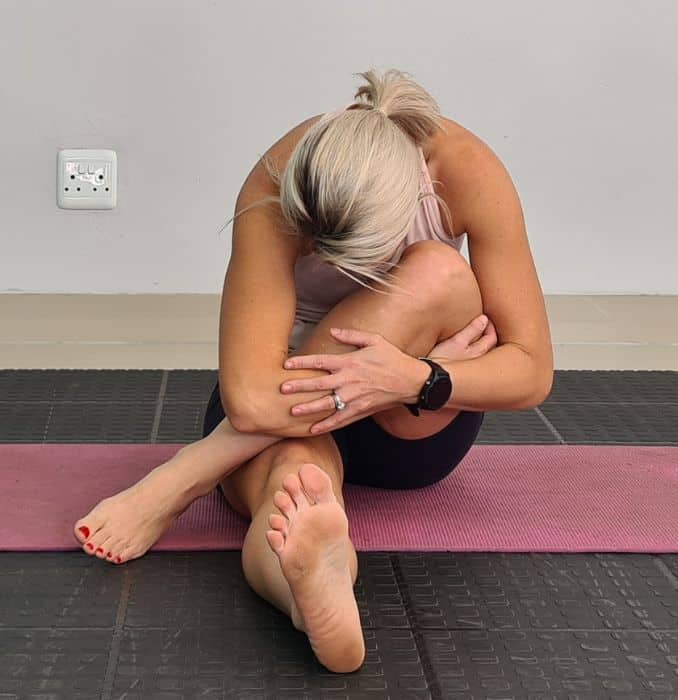
Twist with Forward Bend
Repeat the sequence of movements on the opposite side.
e. Butterfly
Begin in an upright sitting position on the floor, maintaining good alignment with your head, shoulders, and hips. Bring the soles of your feet together and place your hands on your feet. Tighten your core and open your knees out to the sides. Slowly bend your upper body forward. Take a couple of deep belly breaths in through your nose and out through your mouth. Hold this position for 10 seconds.
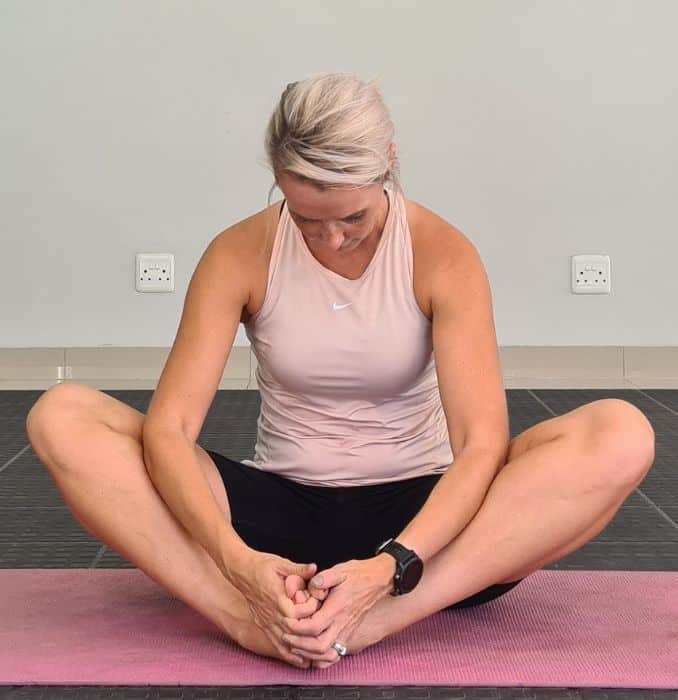
Butterfly
f. Windshield Wipers
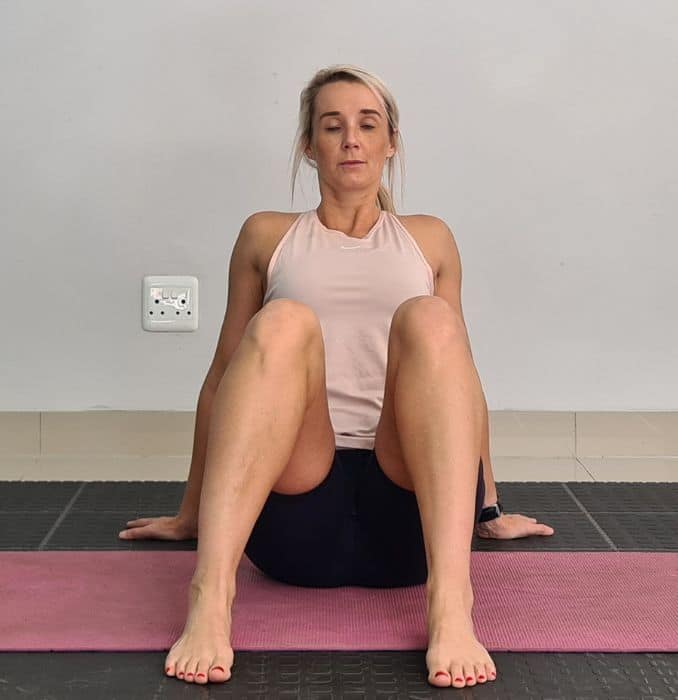
Begin in an upright sitting position on the floor with your knees bent and your feet flat on the floor, wider than shoulder-width apart. Maintain a good alignment in your upper body. Plant your hands on the floor behind you for support. Engage your core and rotate to lower both knees to one side. Repeat the movement in the opposite direction. Repeat the movement. Complete 10 repetitions.
 |
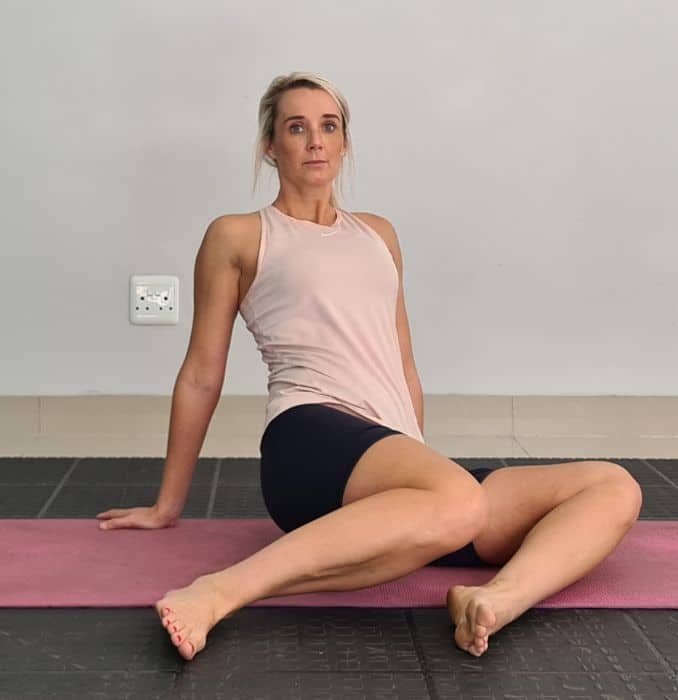 |
Windshield Wipers
7. Progressive Exercises 2:
a. Seated Wide-Legged Stretch
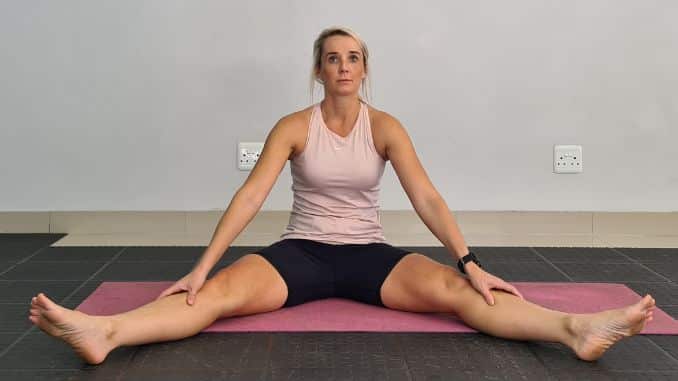
Begin in an upright sitting position on the floor, maintaining good alignment with your head, shoulders, and hips. Spread your legs to the sides, and place your hands on your knees. Engage your core and slowly slide your hands towards your shins, bringing your upper body forward. Hold the position for several deep belly breaths, in through your nose and out through your mouth.
 |
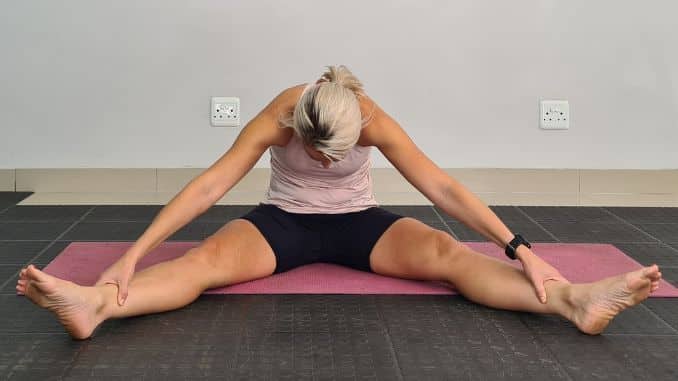 |
Seated Wide-Legged Stretch
b. Seated Wide-Legged Side Bend
From the end position of the Seated Wide-Legged Stretch. Slowly return to an upright sitting position. Engage your core, bring both hands towards your right knee, and slowly bend your upper body to the side. Hold the position for several deep belly breaths, in through your nose and out through your mouth. Relax and repeat the movement on the opposite side.
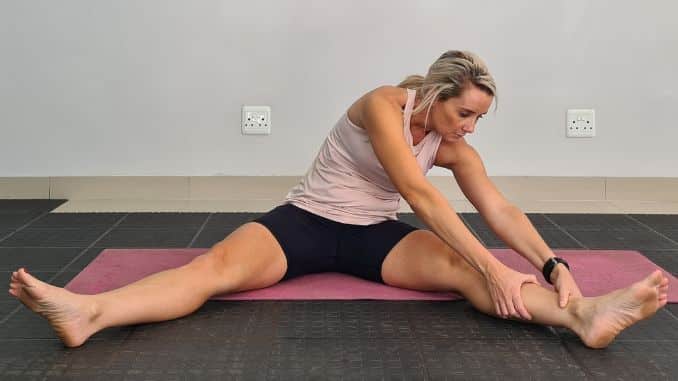
Seated Wide-Legged Side Bend
c. Seated Wide-Legged Forward Fold
From the end position of the Seated Wide-Legged Side Bend. Slowly return to an upright sitting position. Place both hands in front with palms pressed on the floor. Engage your core and walk your hands forward as far as you can while slowly bending your upper body towards the floor. Hold the position for several deep belly breaths, in through your nose and out through your mouth.
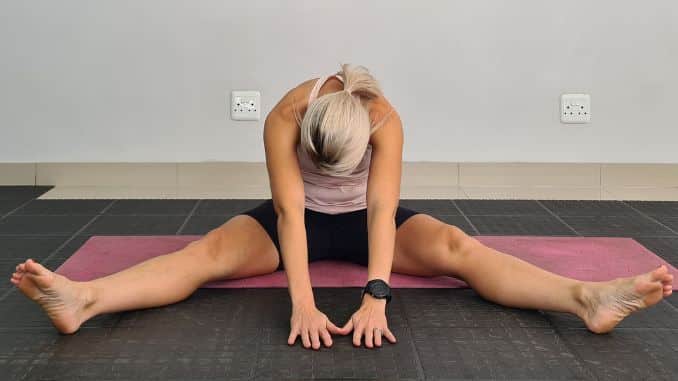
Seated Leg Stretch with Bend
8. Knees to Chest
Lie on your back with your knees bent and your feet flat on the floor. Bring both knees to your chest and hold onto your knees with both arms, looking for a light stretch in the lower back and glutes. Close your eyes and take several deep belly breaths, in through your nose and out through your mouth.
To intensify the movement, you can move both knees from side to side.
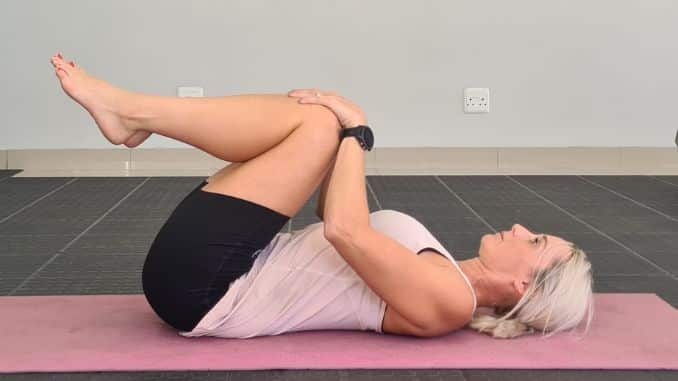
Knees to Chest
9. Happy Baby
Lie on the floor with your knees bent, relaxing your upper body. Engage your core. Bring your knees to your chest and hold onto your big toes with each hand. Hold the position for several deep belly breaths, in through your nose and out through your mouth. Relax and repeat the movement.
To intensify the exercise, alternately move the legs up and down.
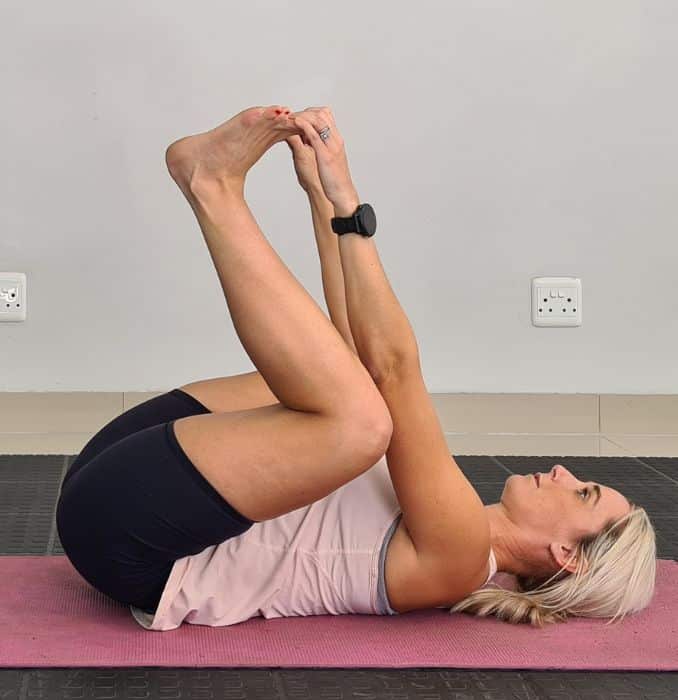
Happy Baby
10. Progressive Exercises 3:
a. Single Knee to Chest
Lie on your back on the floor, maintaining good alignment with your head, shoulders, hips, and legs. Tighten your abdominal area, bend one knee, and use your hands to pull it towards your chest. Look for a light stretch in the hips and lower back. Take a couple of deep belly breaths in through your nose and out through your mouth. Hold this position for 10 seconds.
For added stretch, you can move your foot in a circular movement or from side to side.
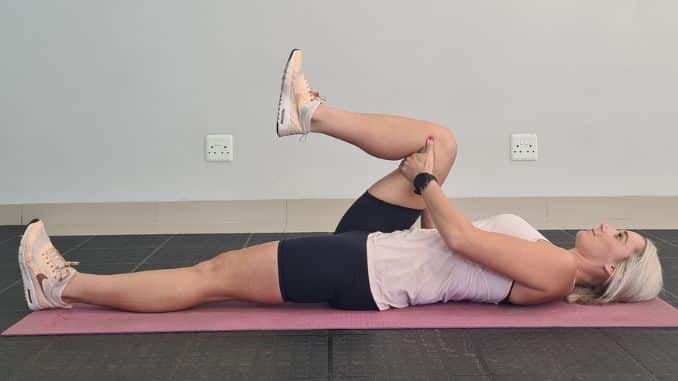
Single Knee to Chest
b. Single Knee Side Stretch
From the end position of Single Knee to Chest. Bring the bent knee to the side, opening your thigh wide as you hold it with one hand for support. Take a couple of deep belly breaths in through your nose and out through your mouth. Hold this position for 10 seconds.
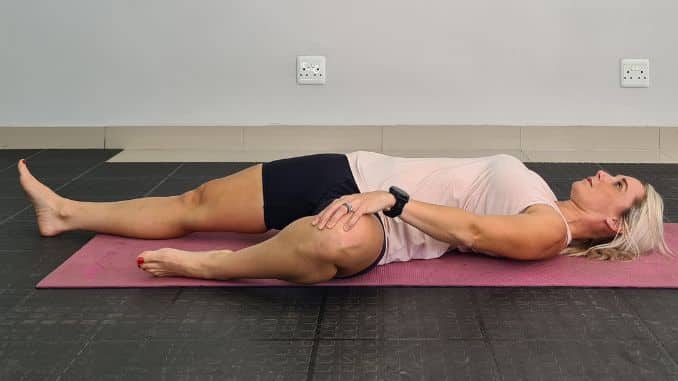
Single Knee Side Stretch
c. Spinal Twist
From the end position of Single Knee Side Stretch. Bring your bent knee to the center, then twist through the low back, pelvis, and spine to bring your bent knee across your body. Lower your bent knee towards the floor with one hand holding it down for support while placing the opposite arm out to the side. Take a couple of deep belly breaths in through your nose and out through your mouth. Hold this position for 10 seconds.
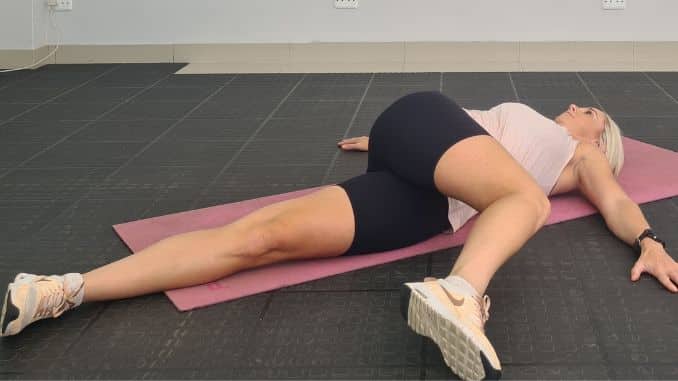
Spinal Twist
Repeat the sequence of movements on the opposite side.
11. Child’s Pose
Begin in an upright kneeling position with your knees wider than shoulder-width apart. Tighten your abdominal area. Shift your hips back to your feet and extend your arms in front. Drop your forehead down, relaxing your mid-back area for a light stretch. Take a couple of deep belly breaths in through your nose and out through your mouth. Hold this position for 10 seconds. Relax and return to an upright sitting position.
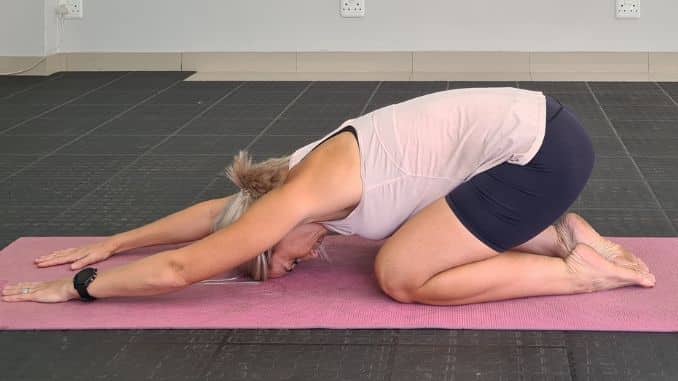
Child’s Pose
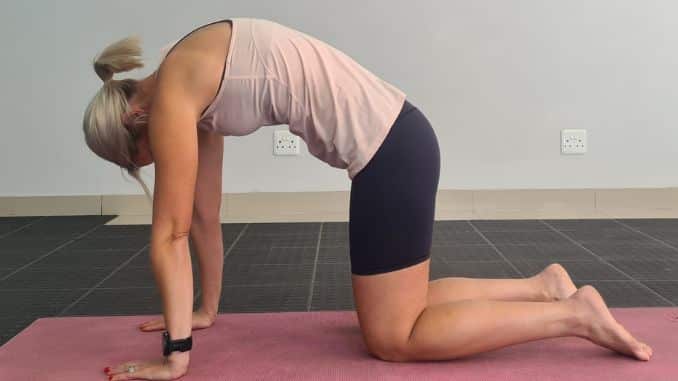
12. Cat-Cow
Begin in a 4-point position with your hands beneath your shoulders and your knees under your hips. Contract your abdominal area. Slowly raise your head as you arch your mid-back. Alternate by lowering your head down and rounding out your mid back. Hold each position for a couple of seconds. Repeat the sequence of movements.
 |
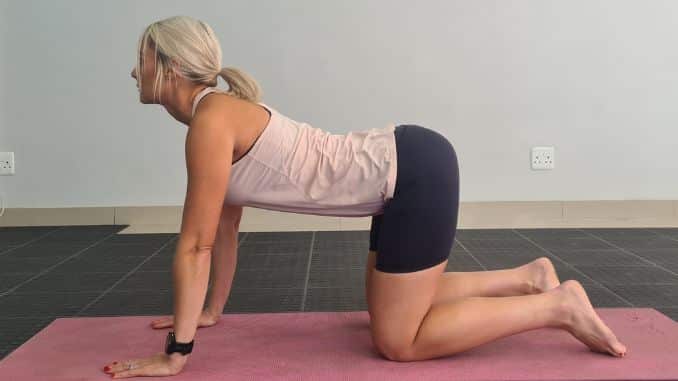 |
Cat-Cow
Tips for a Safe and Effective Practice
You'll learn how to maximize yoga's effectiveness under the guidance of a qualified yoga instructor and always have a pocket-size yoga journal to jot down important notes.
More tips:
- If you need to start in a seated position, slowly sit on your mat with your feet evenly planted on the ground and knees hip-width apart to help you ground and center yourself before moving into more challenging poses.
- Fold forward with care: When you're ready to move into forward folds, keep your back straight and hinge forward at your hips. This will protect your lower back.
- Keep your thighs perpendicular: This will help you engage your leg muscles and avoid strain on your knees.
Conclusion
Yoga poses for tight hips are perfect for adults and young adults hoping to improve their hip health. These poses help you improve your flexibility, strength, and balance. It can also reduce stress and generalized anxiety disorder, leading to better sleep and aiding weight loss. With regular practice of yoga poses for tight hips, you’re giving your hips some much-needed TLC.
By practicing these yoga poses, you can alleviate tight hips, improve your range of motion and posture, and find relief in your knees while accessing a deeper stretch to enhance your overall well-being.

